As part of sharing my journey becoming a full-time artist as an emerging artist, I thought I’d share what I have applied for so far this year and results of the submissions. I’m including Artist in Residence Programs and the exhibitions I’ve submitted to and the quilt names of the images submitted. I thought it might be useful to include dates in which quilts will either be exhibited or when the artist in residence is. The dates are important, as I am careful I don’t overlap submissions, just in case of acceptance.
Artist in Residence Programs
Residency Program
Works Submitted
Result
Cost of Submission
Calendar
Penland Winter Artist in Residence 2023 (2 weeks)
Aroha, One of these things, Isolation, Home
Accepted
$30
7 Jan to 21 Jan
ArtSpace Summer Artist in Residence
Invisible Visible, Rails II, Snowfall, Isolation, One of these things, Aroha, Study No. 3, Cairns, Home, City of Mannheim
Declined
$25
N/A
Durham Art Guild Artist in Residence
Rails II, Snowfall, Isolation, One of these things, Aroha, Study No. 3, Home, Broken Trellis, Ford+Son, Colosseum Wood bock Print
Accepted
$15
Jul to Dec
Hawai’i Volcanoes National Park Artist in Residence Program
Rails II, Isolation, One of these things, Aroha, Study No. 3, Home, Altitudinal Ecosystem
Notification expected 17th November
$160 (for group due to family joining)
Exhibitions
Applied for
Works Submitted
Result
Cost of Submission
Calendar
Town of Cary, Solo Exhibition
Tread, Negative Crosswalk, San Francisco Bustle, Altitudinal Ecosystem, Snowfall, Orange Creamsicle, Rotating Spokes, Manicured Gardens, Rails I, Sunday Best
Accepted
$0
7 Jul to 19 Aug
QuiltCon (2023): Minimalism Category
One of these things
Declined
$20
NA
SAQA: Minimalism
One of these things
Accepted
$40
2023 to 2026
Scaffold
Outskirts
Accepted
N/A
3 Apr to 30 Jun
Excellence in Quilts (Fiber Art Now)
Rails II, Ford+Son, Colosseum at Night
Declined
$30
N/A
2023 Exhibition In Print (Surface Design Association)
Ford+Son, Rails II, Snowfall
Declined
$30
N/A
NC Artist Exhibition
Ford+Son
Accepted
$35
24 Sep to 22 Oct
DAG: Breathing New Life
Live Life
Accepted
$0
18 Aug to 22 Sep
Quilts=Art=Quilt
Rails II
Declined
$35
Additionally, I was asked to participate in a 3 person exhibition, Modern Textiles at “The Art Gallery” Fayetteville Technical Community College. It will run 23 October to 14 December and I will have up to 5 pieces hanging.
Future Planned Submissions
I don’t plan on many other submissions this year, but here are a list of possibilities with the exhibit dates:
The good news is, this year, I have work showing in various places from April through December (ArtSpace, Page-Walker, Durham Bottling Company, European Patchwork Meeting (France), Contemporary Art Museum Raleigh, and Fayetteville Technical Community College).
I’ll let you know how the rest of the submissions go. If you have questions, please leave them in the comments below and I will do my best to answer them.
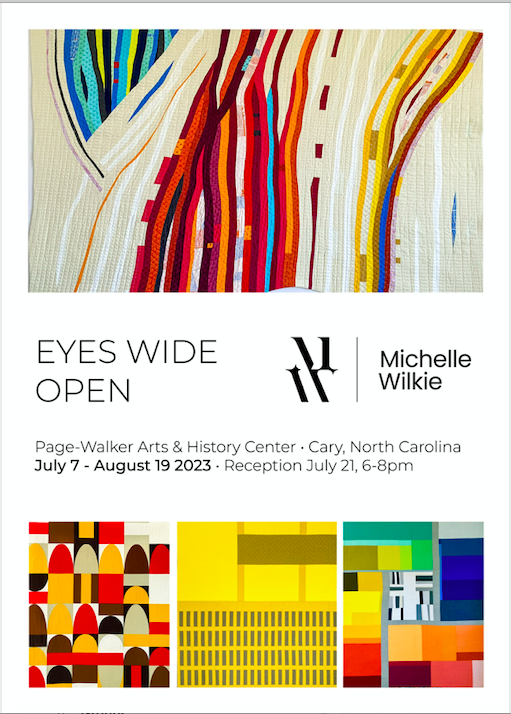
Firstly, my show “Eyes Wide Open” exhibits a selection of quilts I made over the last 10 years. Each quilt, in this show, was designed based on something I have seen. You will see each quilt hung with their inspiration image and a description of the where the inspiration came from. The show description:
“Have you ever thought what people miss seeing and experiencing on a daily basis? We all, too often, get stuck in a routine and distracted by our electronic, and social media-based world. What details are we missing by not taking the time to really see and experience those things around us? The artist believes that with practice and intention, we can be inspired by patterns and design elements in objects we see or events we experience, every day.
Eyes Wide Open is a visual journey in seeing design in everyday objects. Capturing everyday objects with photography and then translating those objects into textile art, quilts, for everyone to experience what the artist saw every day.“
It opened at Page-Walker Arts and History Center (in Cary NC) July 7th 2023 and closes August 19th 2023.
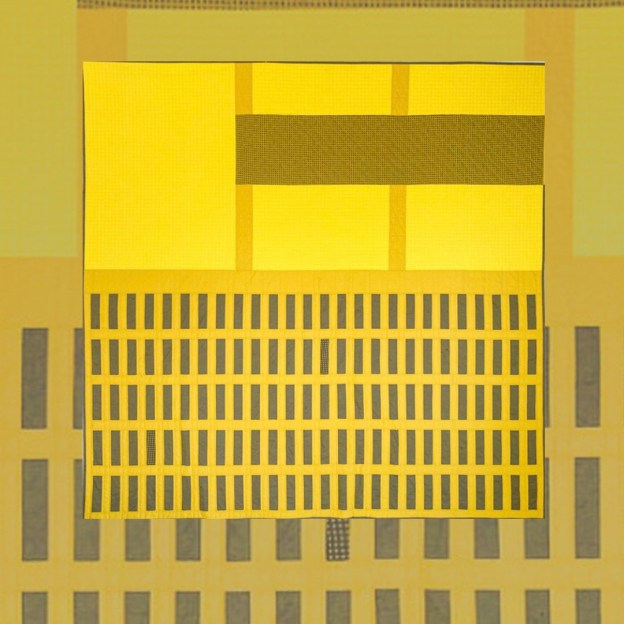
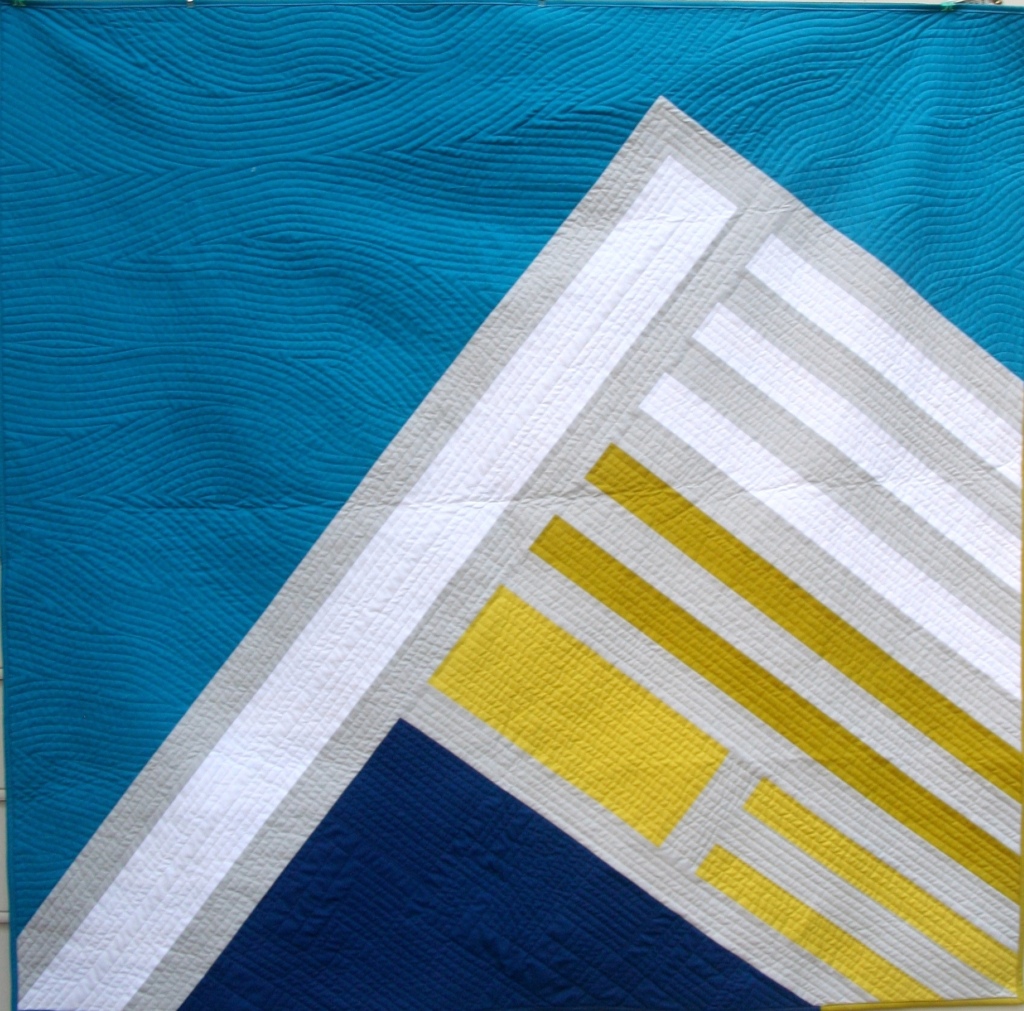
Top: Manicured Gardens; Bottom: Rails II Inspiration Image (left); Final Quilt (right)
Above are examples of the inspiration image and the final quilt for two pieces; Manicured Gardens and Rails II. Here are their accompanied descriptions
Manicured Gardens This one-of-a-kind quilt, Manicured Gardens, has unique shapes that were inspired by Fleur de Lis shaped shrubs found in the center walkway at Schwetzingen Palace Gardens in Germany. Each shape is hand stitched onto the backing fabrics. The vibrant colors of Alison Glass Fabrics bring the feel of garden colors against the neutral background. Completed 2019, award winning quilt and exhibited at QuiltCon.
Dimensions: 50” w x 50” h Techniques and Materials: Needle-turn appliquéd, and machine quilted. Binding Hand Sewn. High quality quilting cottons and cotton batting. Quilted: Suzan deSerres (Singing Stitches)
Rails II is part of a series that is inspired by the Neuostheim Railway junction. The artist and her husband lived in Mannheim, Germany and travelled through this junction almost every day. As she travelled, she thought about the number of trains and people who have also travelled through, where were they going, what connections were made, what history has this junction seen.
She explored these thoughts (paths) in making these strips connect and move away from each other. This quilt was both machine and hand quilted. The hand quilting used embroidery cross-stitch matched to the color of the fabric. The cross-stitch continues with the railway theme representing the universal road sign of a railway.
Dimensions: 52” w x 45” h Techniques and Materials: Machine Pieced, Improvisation. Hand and Machine Quilted. Faced Binding Hand Sewn. High quality quilting cottons and cotton batting. Photography:Daniel Kummer
The Journey to the Show Installation
Getting ready for my show was pretty smooth, since I was no longer working full-time. It was not without some bumps though. We were going on vacation June 17th to July 4th, so everything needed to be ready before June 13th. I had a plan.
By May 25th, I had my web page for the ability to purchase quilts done, the postcards had been sent to the printers (used Moo, when they had a great sale on, in case you are interested), the canvas photo prints had been delivered (used Snapfish also during one of there 75% off sales) and a list of quilts that need sleeves stitched on (6 in total), 5 quilts needed labels stitched on and lastly one series of stretched framed pieces to finish. Unfortunately, I needed to fly home (NZ) for a family emergency (my father’s fingers took on a circular saw and lost).
What did this mean? I took one quilt with me to NZ, to put faced binding on and a sleeve and label. I dropped a couple of quilts off to friends who would stitch on sleeves (all I could do was provide the fabric). The rest was finished on the 4th-5th of July when we returned from our WY->SD trip.
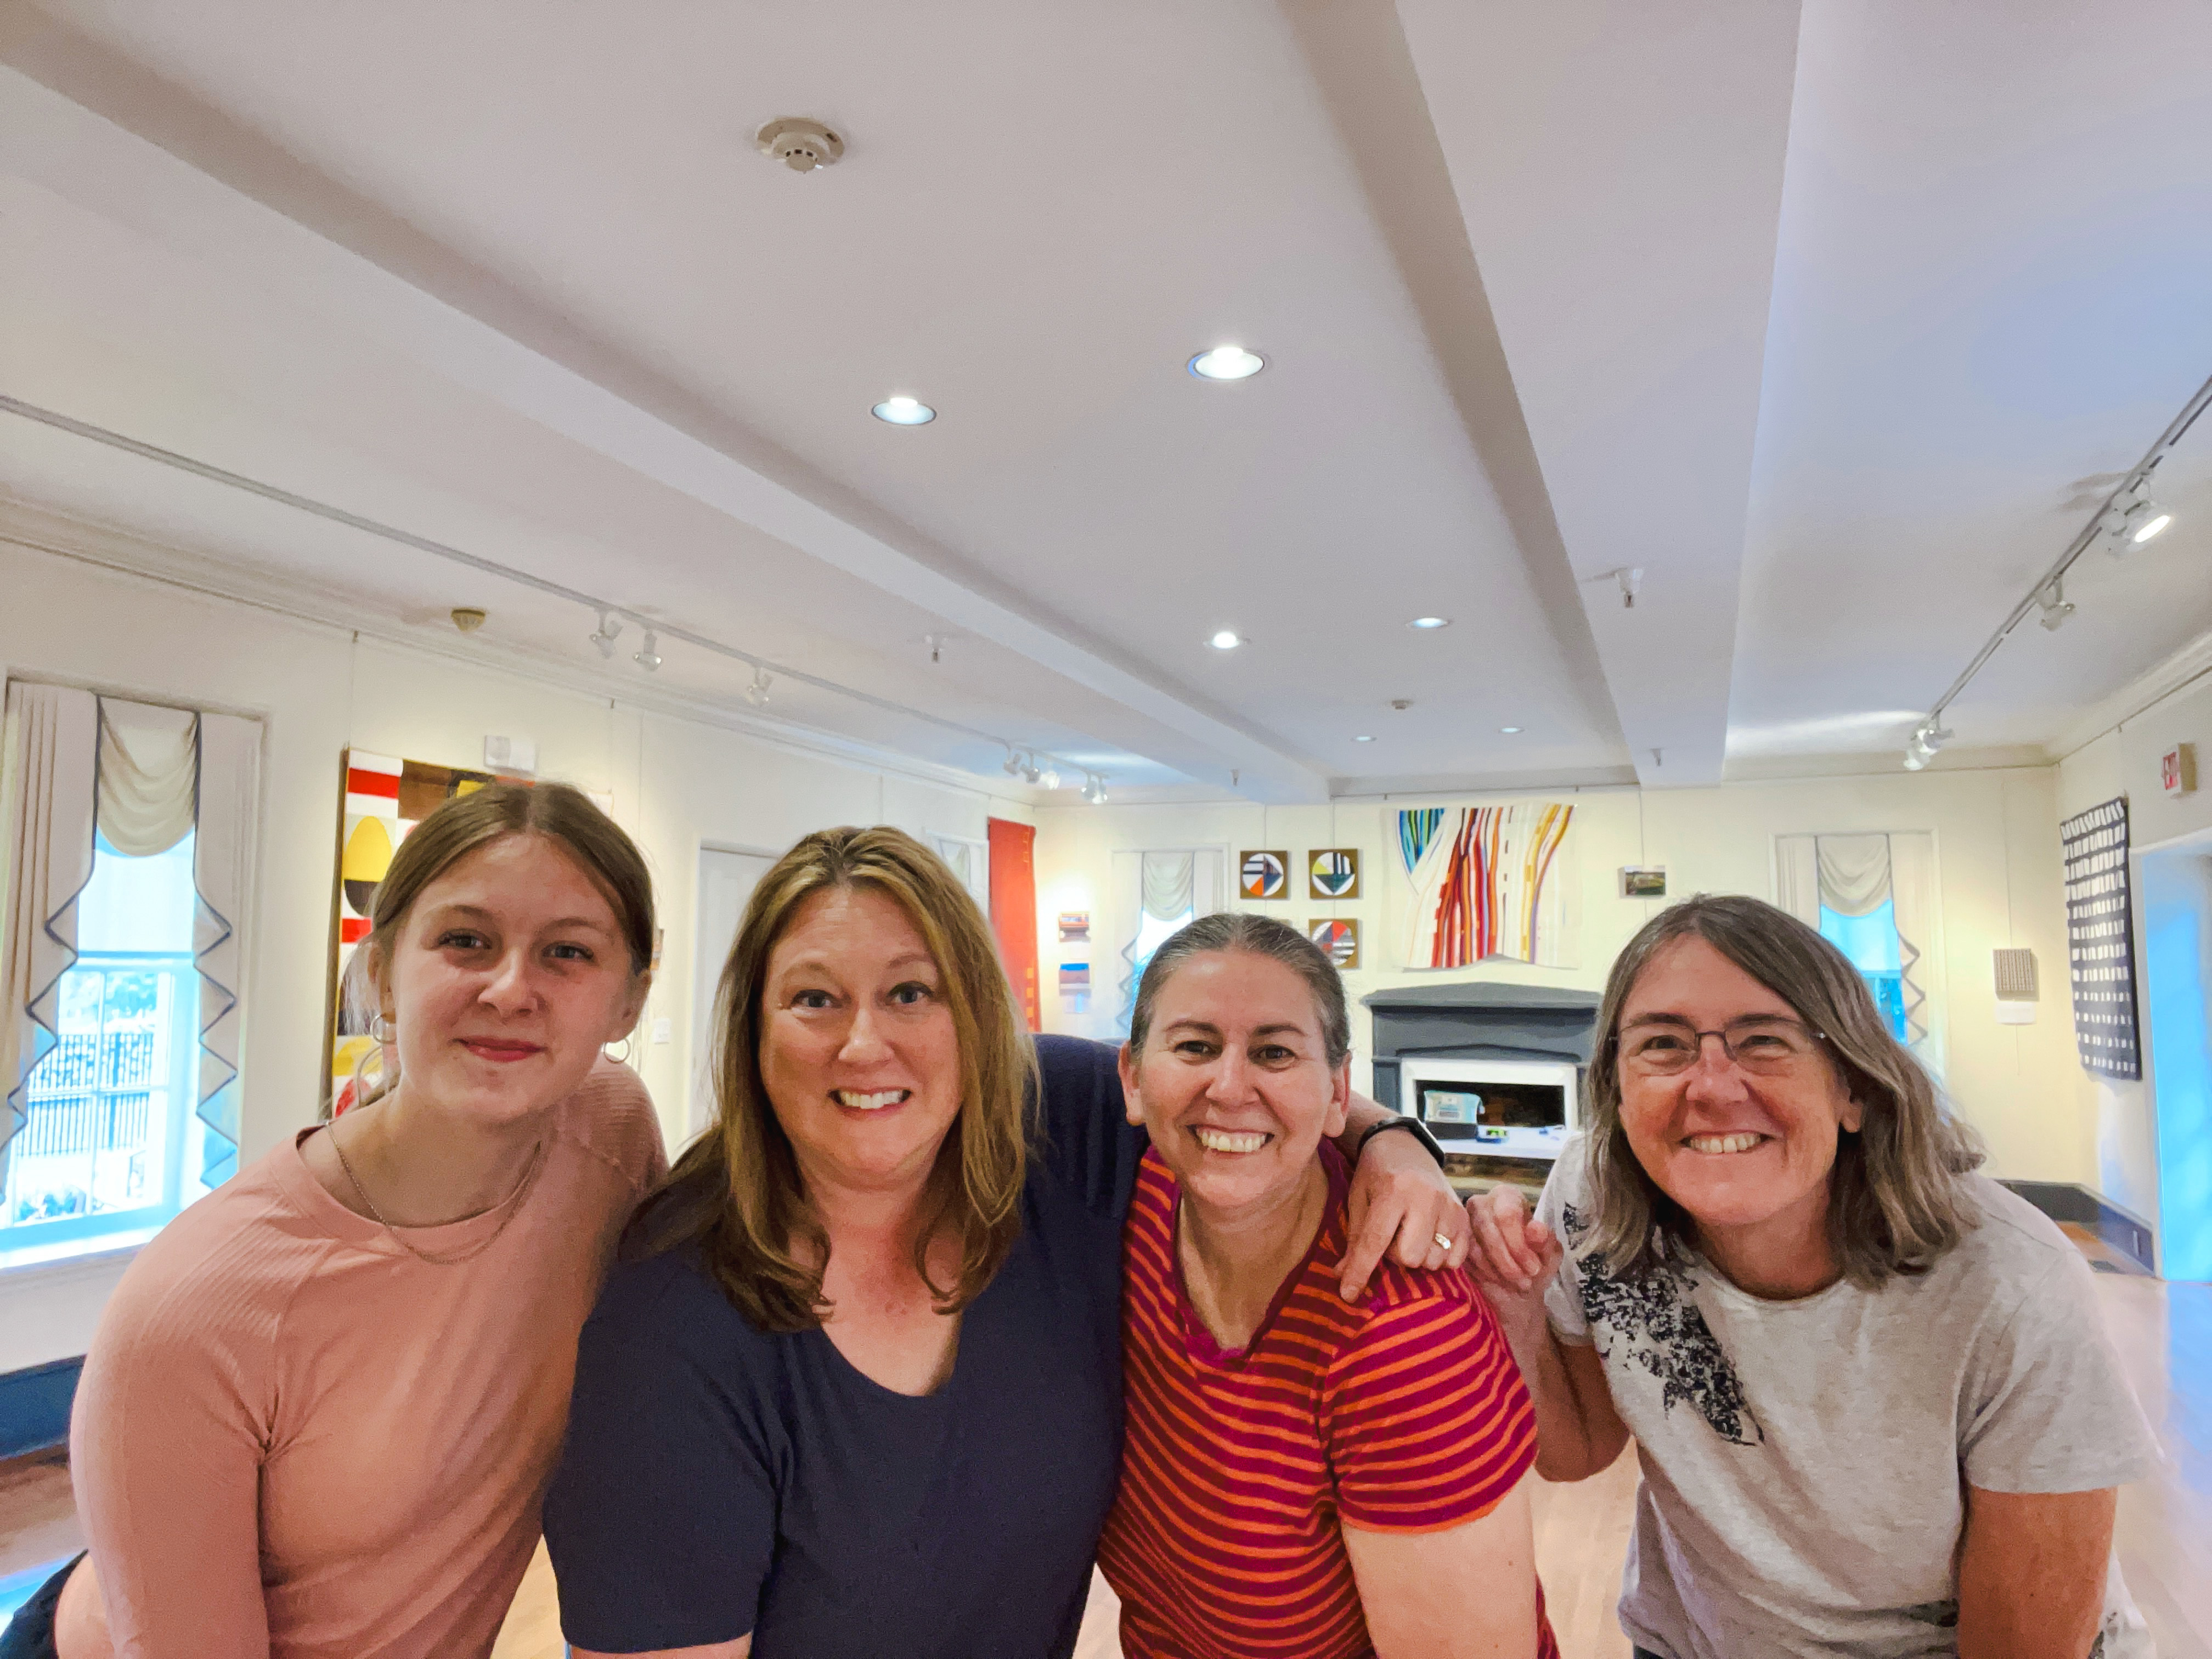
I couldn’t have done this show without my husband and friends who helped out (Valerie, Melissa and Patty).
Installation
On installation day I packed the car. I had the quilts organized with their hangers and rolled with acid free paper, each of their matching inspiration canvases, and each with the laminated description card. Also, I had my postcards and laminated show description and bio that also were to be hung.
Installation went really smooth with a wonderful group of women. We had it all done in 2 hours and 15 minutes. The hanging system provided by Town of Cary made it really easy. They provided the information earlier when I signed the contract so I could prepare as I went. In the end we hung 31 pieces (11 quilts, 8 framed quilted pieces and 12 photo canvases in all).
One recommendation I have, if you can, go to the place where you will be installing and take a look. I did this about two months before installation day and realized that while I had wall measurements, I needed to take into consideration the vents and fire alarms that took up some of that space. Also, I found out during that visit, I had an entrance way (hallway) where I could include another 3 works. I took video of the space and reworked my plan with these things in mind.
Meet the Artist Reception
I was so nervous leading up to the reception. Self-doubt had entered my head. What if no-one turned up? Thankfully, that was not the case and my friends reminded me that this was a celebration of my accomplishment and it didn’t matter who turned up. We would celebrate anyway.
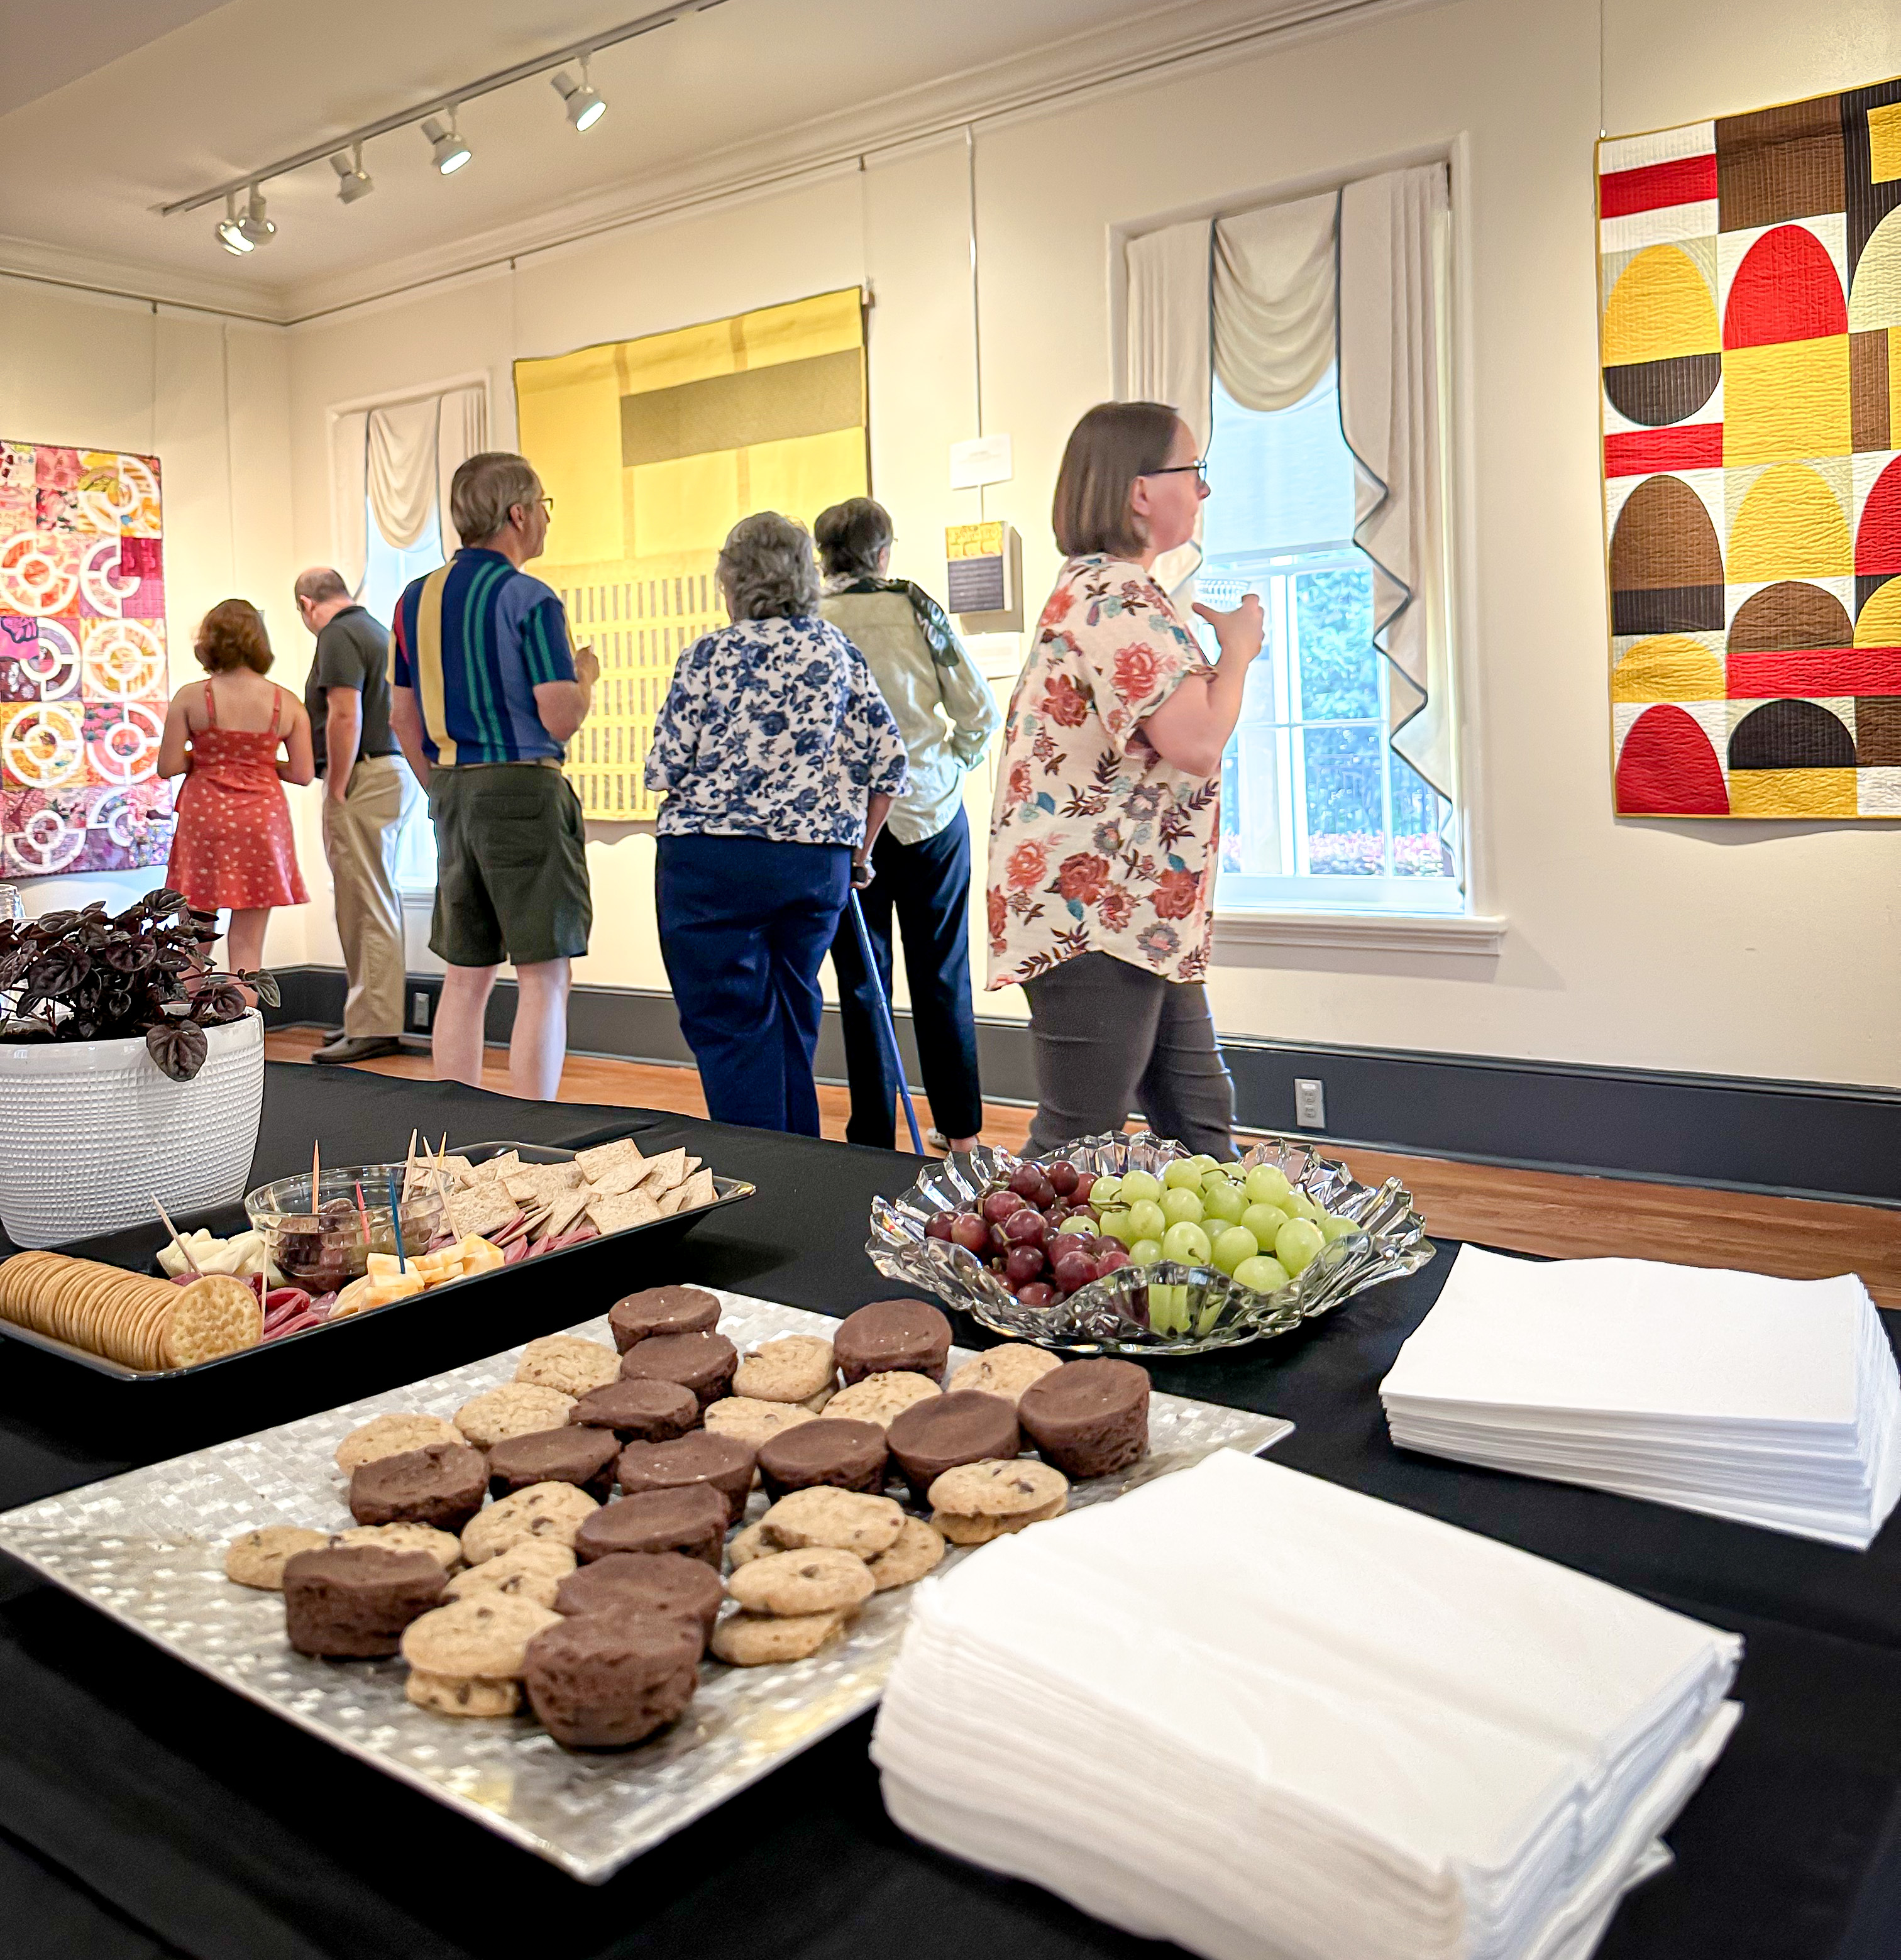
Something to think about if you have a show…..The week before the reception I talked with the Page-Walker Director and found out what they provided (fruit and cheese plate, small cakes, and water) and checked if I alcohol was permitted if I provided it. I provided beer and wine to the guests.
Another recommendation…Have a friend who can take photographs be on photograph duty.
The reception was amazing. We had about 80 people come out. I talked to so many people in the two hours but also know I missed a lot of people too. I am so thankful to everyone that came out.
I got great feedback on including the inspiration image with the quilt. It helped people understand the final piece. Also, it was fun hearing about people’s favorite piece. It was surprisingly varied and just shows that it depends on people’s tastes.
Overall, it has been an amazing experience and one I would love to do again. If you are local or passing through, It is still open until August 19th at Page-Walker Arts and History Center, Cary NC. I would strongly suggest calling ahead making sure the exhibition is available the time you want to see it (they host wedding receptions and classes so access might be limited).
If you are not local or able to see the show in person, I have a video walk-through available on my Instagram account.
Let me know if you have questions, leave it below in comments and I will try and answer them.
In 2022, one of my goals that I needed to accomplish to quit my job and become a full-time artist was to be successful in getting accepted to do a solo art show (exhibition). I was successful in that task.
Town of Cary (in NC and where I live) has a rolling call for artists that get reviewed twice a year (August 1 and February 1). You will need 10 digital images of your work (that has to reflect what you will exhibit but not the actual quilts), an image list, a resume (including exhibition history….if you are a quilter include quilt shows), and an artist statement for the exhibition. If approved you will be provided a space in one of the below galleries (the selection committee decides on the space and let’s you know).
I maintain an image list of all my quilts to make this process easier. For me, I created a document with the name of quilt, name of file (possibly location on my drive), size of quilt, and year it was made in a table format. For example:
Altitudinal Ecosystem
IMG01_AltitudinalEcosystem_Wilkie
60 x 60″
2015
Tread
IMG02_Tread_Wilkie
60 x 60″
2019
Image list
Town of Cary requests the name, medium used (for me that is textiles) and size.
Artist Statement
Eyes Wide Open Have you ever thought what people miss seeing and experiencing on a daily basis? We all, too often, get stuck in a routine and distracted by our electronic, and social media-based world. What details are we missing by not taking the time to really see and experience those things around us? The artist believes that with practice and intention, we can be inspired by patterns and design elements in objects we see or events we experience, every day.
Eyes Wide Open is a visual journey in seeing design in everyday objects. Capturing everyday objects with photography and then translating those objects into textile art, quilts, for everyone to experience what the artist saw every day.
Resume
Here is a sample of what I submitted in my resume. I also included publications and teaching in the full resume but not shown here.
Collections SAS Art Collection: NY Highline, Rails, Pyramids
Shows | Exhibits 2022 Mid-Atlantic Quilt Festival 2022|Quilts: Isolation, One of these things QuiltCon 2022 |Quilts: Aroha, Inside Looking Out, Study no. 3 NC State Fair 2022|Quilts: Aroha (1st Prize), Home (1st Prize), Whitney (4th Prize)
2021 Monster Drawing Rally, NC Museum of Art Modern Quilt Showcase (International Quilt Festival)|Quilt: Study no. 3 Hearth Studio |The Art of Process Exhibition (Quilt: Isolation) QuiltCon 2021(virtual) |Quilts: Study no. 3, Orange Creamsicle, Isolation
2020 and earlier QuiltCon 2020 |Quilts: Correlation, Manicured Gardens QuiltCon 2019 | Quilts: Mt. SohCahToa, Fractions & Snowfall AQS Fall Paducah 2018| Quilt: Fractions QuiltCon 2018 | Quilts: San Francisco Bustle AQS Grand Rapids 2017| Quilts: Sunday Best & Phased Circles QuiltCon 2017 | Quilts: Rails, Sunday Best, Negative Crosswalks, NY High Line AQS Grand Rapids 2016 |Quilt: Altitudinal Ecosystem QuiltCon 2016 | Quilts: Altitudinal Ecosystem, Jungle Ave Tapa QuiltCon 2015 |Quilts: Phased Circles, Neighbourhood
Success
After applying in February 2022, I was notified that my application was downloaded for review. However, they were holding applications until they could rebook all the shows that were canceled at our various facilities over 2020 and half of 2021. They informed me that I should hear back from them in the coming months, as they book shows for 2023.
I was a little bummed with the news but understood. It had been a strange couple of years. In July 2022, low and behold, I received news that I was invited to exhibit my work at Page-Walker Arts & History Center. Install date was July 6 2023, Reception date July 21 2023, Show dates were 07/07 to 08/19 and removal date is August 21.
Next Steps
I accepted, of course. I received a contract that was really clear on several things like
Terms of Loan
My responsibilities vs. Page-Walker for hanging the show
Sale information: Prices could not be included in the show itself but could be provided on a price list at the entrance way.
Care and return of art works
Warranties.
Just to name a few.
I also received install (hanging) instructions for the equipment they used; and the room dimensions so I could plan out the layout.
Close to the end of the year 2022, I had to provide an image of a quilt in the show and an updated show description for the exhibition website.
Lastly, closer to the install date I also provide a price list for insurance purposes. I opted for outside my studio a postcard (in the above image at the top) with a QR code and contact information on the back (includes my IG account, Shop url just in case the QR Code doesn’t work, and my email address).
Let me know if you have any questions. Next post, I’ll show you some of show. In the meantime, take a look at my new website which I set up in time for my show. It includes my gallery and shop.