Spoonflower Sampler Quilt {Block 4: Formula One (on the track)}

The overall Spoonflower Sampler Quilt Top can be seen here, along with links to the fabric used. Below are the instructions for block 4 of 9.
IMG_9505

Materials and Cutting Instructions

Fabric Amount Cutting instructions
 Fabric A (Light Blue)   Scrap
  • One (1) 1 1/2” x 30”
 Fabric B (Green)   Scrap
  • One (1) 11/2″ x 28”
 Fabric C (Grey)  Scrap
  • Three (3) 3 1/4” x 5” rectangles
 Fabric D (White)   Fat eighth
  • One (1) 1 1/2” x 30”
  • One (1) 1 1/2” x 28”
  • Three (3) 3 1/4” x 5” rectangles

Planning your block

In this folder, is a blank map for your block. Use colored pencils to plan out your fabric selections.

NOTE: I recommend planning this block with block 5.

Making your block

For making this block, you will be making it as three separate components (horizontal stripes, vertical stripes and Half Rectangle Triangles HRT), before joining together to make the final block.

For the Vertical Stripes (Green and White strips):

  1. Take the 1 1/2″ x 28″ strips of Fabric B & D, and place them right sides together (RST).
  2. Sew a 1/4″ seam down the length of the strip, press seams open.
    NOTE: It is important that you sew a straight line as wonky seams will be noticeable.
  3. Cut the strip in 1/2 at 14″. Sew the two halves together, making sure you are alternating the strips. Press seams open.
  4. Trim the length of the strips to 12 1/2″. Unfinished size: 4 1/2″ x 12 1/2″.

For the Horizontal Stripes (Light Blue and White)

  1. Take the 1 1/2″ x 30″ strips of Fabric A & D, and place them RST.
  2. Sew a 1/4″ seam down the length of the strip, press seams open.
  3. Cut the strip in 1/2 at 15″. Sew the two halves together, making sure you are alternating the strips. Press seams open. You now have 4 alternating color strips.
  4. Cut the 15″ strip into three (3) 4 1/2″ squares. Piece each square together, joining so the lines are running horizontal.
  5. Press the seams open. Unfinished strip should be 4 1/2″ x 12 1/2″

For the HRT:

  1. You will need six (6) HRT measuring 2 1/2″ x 4 1/2″ unfinished. Please follow this tutorial (see bottom of the page) using the 3 1/4″ x 5″ Rectangles of Fabric C & D.
    NOTE: I recommend reading through the whole tutorial and think about the placement of your colors – you will need to position your fabrics correctly for the right placement.
  2. Sew the six (6) HRT together in a strip (checking correct direction/placement). Press seams open. Unfinished strip should be 4 1/2″ x 12 1/2″.

Finishing your block

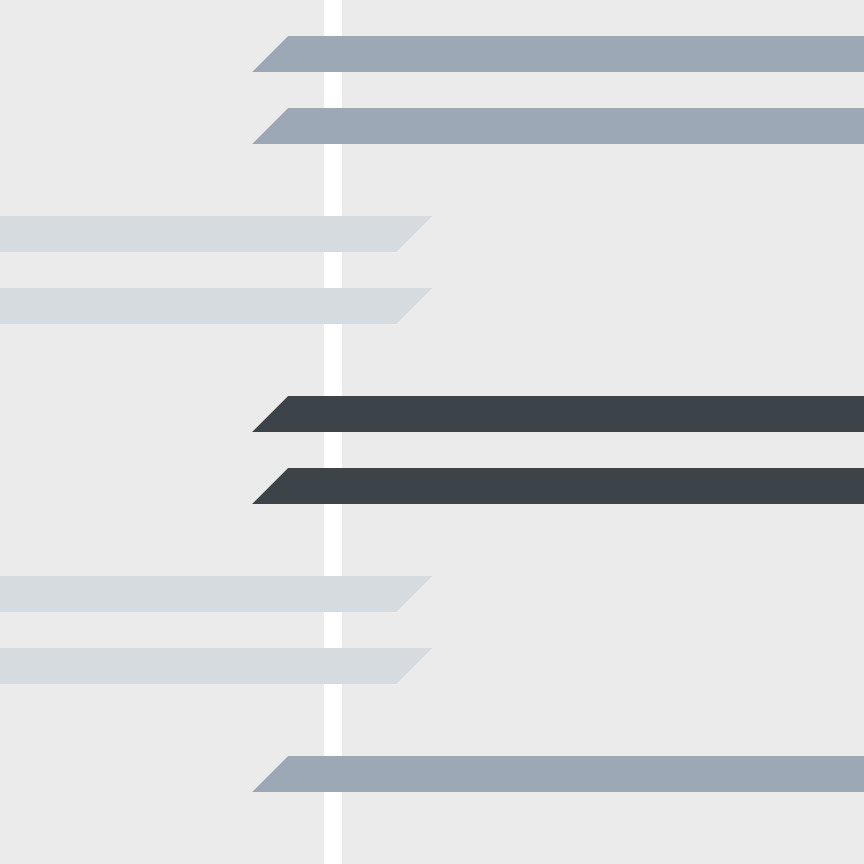
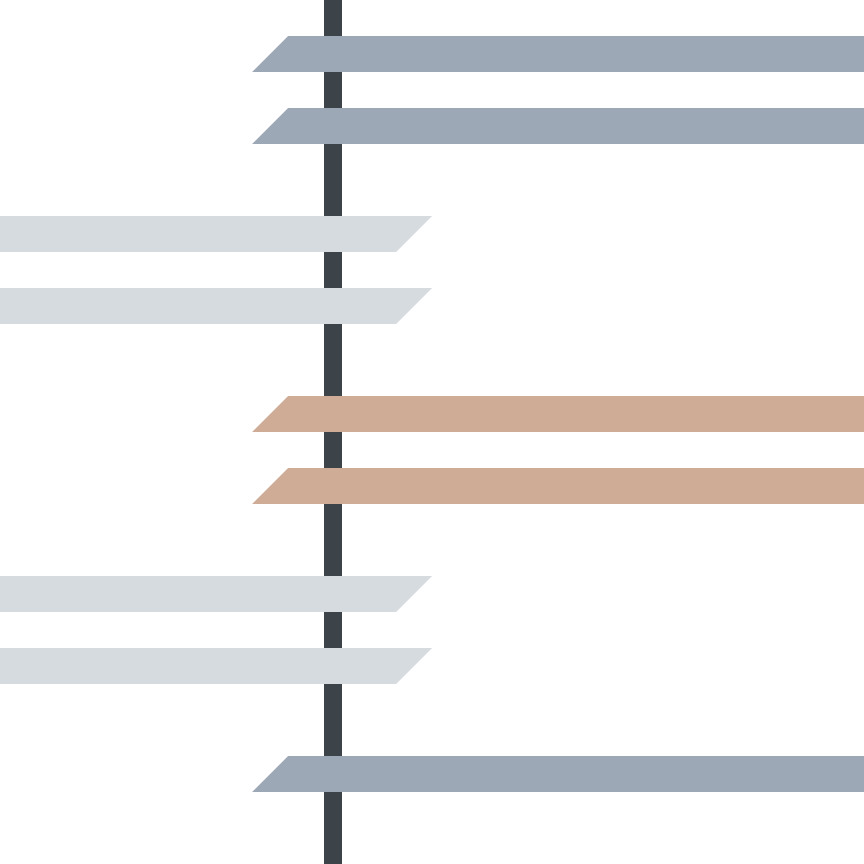
  1. In this final step,  join all three previous components together, starting with the horizontal stripes to the vertical stripes to the HRT (Figure 1).
    Block4_FinalBlock
    Figure 1: Joining of the three components
  2. Press seams open and your block is complete. Unfinished 12 1/2″ square.

Hope you enjoy the block, let me know if you have any questions. Come back tomorrow for block 5 and Thursday for Block 6.

Additional Spoonflower Sampler Quilt Block tutorials:


Book Review Tuesday: Quilting from Every Angle

It has been a while since I did a “Book Review Tuesday”, but I have a great reason to resurrect it today.

I am so excited to be the first on Nancy’s blog tour for her new book. Nancy is in our modern quilt guild and inspires our members, all the time with her modern quilts. It is so great, that she can share her talents with a wider audience, through this book.

QFEA_CoverMechanical.indd

Review

Title: Quilting from Every Angle
Author: Nancy Purvis
Publisher: Interweave
ISBN: 978-1-63250-086-1

I was totally inspired by this book. Starting with the first section, which does a great job introducing quilt design and design tools to its readers. I love the idea of creating an inspiration board.

antlers quilt owens olivia 2

I seldom pick up a book and find more than 2-3 projects in the book that I just need to make. This book offers so many choices that meet my design aesthetic. The projects are well made to show off their modern design elements – each project highlights the design elements, the color, and the quilting choices.

quilting from every angle mesa quilt owens olivia

Some of my favorite projects in the book are:

  • Fossil #fossilquilt
  • Sequoia #sequoiaquilt
  • Mesa #mesaquilt
  • Four Corners #fourcornersquilt
  • Concordia #concordiaquilt (I think I may make this quilt design into a table runner)
  • Vertebrae #vertebraequilt

vertebrae quilt quilting from every angle owens olivia

I loved this book and so excited to get time to make more of these projects.  I would recommend it to everyone so it is a 5/5:
images-6 images-7 images-8 images-9 images-4

You can purchase a signed copy of Nancy’s book and find the updates to her book on her blog.

My Project

The first project I made from her book, was Fossil. I decided I would make it as mini quilt so I can hang it on my wall at work. I shrunk the HST from 3 1/4 inches unfinished to 2 inches unfinished.  I knew immediately that I wanted to use Alison Glass text print and Alison Glass Handcrafted lines.
AG_Fossil_MichelleWilkie

The quilt came together quickly. The design offers you several ways in which you can make it your own, either with the fabric selection and/ or quilting.

AG_Foosil_Quilting_MichelleWilkie

I tried to pull the colors from the triangles into the binding by using some of the scraps from the HST’s.
Canoe_Fossil_MichelleWilkie

Blog Tour

Don’t forget to check out others on her blog tour, she has a great line up.

11/10- Michelle Wilkie of Factotum of Arts
11/11- Hillary Goodwin of Entropy Always Wins
11/12- Karen Lewis of Karen Lewis Textiles
11/13- Anna Graham of Noodlehead
11/16- Rachel McCormack of Wooden Spoon Quilts
11/17- Tara Larson of Rad & Happy 
11/18- Jennifer Mathis of Ellison Lane
11/19- Holly Hughes of Holly Gets Quilty
11/20- Nicole Daksiewicz of Modern Handcraft
11/23- Pat Bravo of Pat Bravo Fabric Design and Jesse Maloney of Art School Dropout
11/24- Astrid Slagle of Red Red Completely Red
11/25- Holly DeGroot of Bijou Lovely
11/26- Christopher Thompson of The Tattooed Quilter
11/27- Spoonflower

Give-away

WINNER is Sarah who wants to explore negative space. She wrote “I think I need to challenge myself by incorporating negative space in my modern quilts. Thanks for the chance to win!”. We will be sending you an email shortly.

——————————————————————————————————————————————

Lastly, Nancy has been kind enough to offer a digital copy of her book as a giveaway. I hope you all can enjoy it and be inspired as much as I am with her book. Just leave a comment below answering “What elements of modern design you would like to try in one of your quilt projects”.

There is a second chance to win if you are a follower, just leave a second comment. A winner will be chosen at random next Tuesday November 17th at 6pm EST.

A disclaimer, all reviews and opinions of the books reviewed will be mine, unless otherwise stated. Please note, I may not respond to all comments due to volume and bandwidth.


October Quilt Designs

I have been busy making the last couple of months, and have not designed as much as usual. I have however liked a couple of my designs over the last week…so I think I’ll start in reverse order.

29 October: Wheels turning

Screen Shot 2015-10-30 at 12.20.04 AM

I love the idea of some improv. wedges in this design. I think there are a lot of opportunities for quilting to bring out the shapes.

QDAD_29OCT2015(1)

I added a slightly darker background here, just so you can see the circular centers.QDAD_29OCT2015

27 October: Split Court

Screen Shot 2015-10-29 at 7.55.36 PM

I started with simplistic shapes and loved it instantly. This is the final design with a reduced color palette.

QDAD_27OCT2015(1)

Here is what I started with using an extra color. I like it still but not as much as the reduced version.
QDAD_27OCT2015

24 October: Washboard Shutters

Screen Shot 2015-10-28 at 5.39.31 PM

I loved this muted color palette. I was inspired by the french buildings and thought of shutters. I like the alternating shutter placement with the of centered main post.

QDAD_24OCT2015

I played with the color palette a couple of times before deciding on this final version. I also have one with the pale tan colored shutters. I thought this palette may also look better with a white background. I like the one on the left but prefer the limited color palette again.
QDAD_24OCT2015(1)    QDAD_24OCT2015(2)

19 October: Visions through a Mountain Fog

Screen Shot 2015-10-22 at 9.33.57 PM

I have been dying to get a monotone palette to try out some improv. block designs. I originally thought this would be great with red’s but loved our it turned out with this dark grey neutral palette.
QDAD_29October2015

22 October: Autumn leaves

Screen Shot 2015-10-22 at 9.06.12 PM

My least favorite of my designs. I was using the placement of the leaves as placement of color in my design. I played with the scale and found that the larger version was better.

QDAD_22October2015(1)

Please Note: If you would like to make or use one of my designs, please email me (ml_wilkie(at)hotmail(dot)com) or leave a comment below. I am happy to talk with you on options and provide the relevant measurements etc. or have you test out a pattern. Also, if you use one of my designs, please use the following text to credit me the design: “Designed by Michelle Wilkie @ Factotum of Arts”.