Author Archives: mlwilkie

Unknown's avatar

About mlwilkie

Software Developer, Mother, Wife with keen interest in art, design and crafts of all kinds.

Playing with Large Scraps {creative journey}

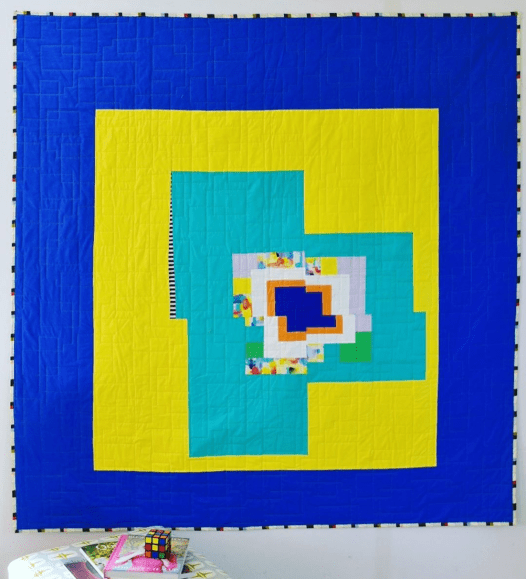
I have been in a somewhat creative rut since November or so, however I have recently discovered Stanley Whitney’s work. He had his work on display at Lisson Gallery in New York, and has a unique style where his pieces use large colored painted areas represented in rows.

Then one day, friends and I were talking about these larger scraps we had and how fun it would be to use those scraps to make quick scrappy quilts. These two events then merged in my head. As a result, I have been playing with a series of ideas.

The first was to take Stanley Whitney’s idea and explore the concept to fabric. I used the yellow fabric as anchor, to draw people in and follow it down. My favorite parts to this was introducing the strip fabric and also that interaction with the lighter blue scrap along the first row sashing and green triangle in the pink.

IMG_5139

“Whitney” (~55″ x 60″)

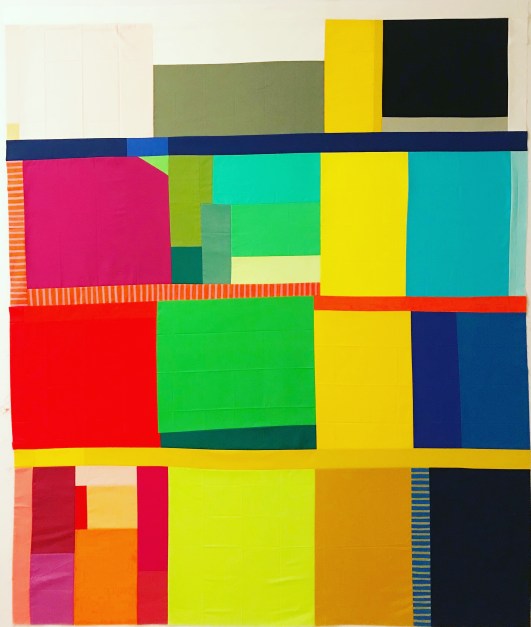
The next one, I wanted to explore using all neutrals with a couple of splashes of color, in the sashing (yellow and the red linen print). I enjoyed the use of various fabric substrates in this one – linen, cottons, denim’s and flour sacks.

IMG_5204

“Stanley” (~50″ x 55″)

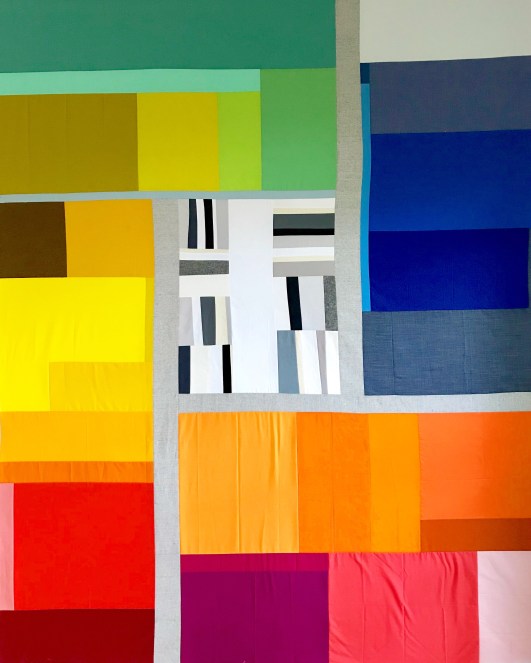
This last and most recent piece was taking the original concept but making a piece truly me. The colors I had left over, were almost rainbow like. I liked keeping the like colors together and forming these blocks. I used a linen from Robert Kaufman as sashing and I really enjoyed how this worked within this piece.  These the blocks of color and sashing I think help the eye move around the piece.

The hardest part of this quilt was deciding on the middle, it definitely took several trials, photo’s and text to friends for opinions. In the end, I had some striped class samples I use in my Improvisation class that when placed up on the design wall, I immediately knew this was the center. The center in its very neutral but smaller piecing, centers the piece – couldn’t be happier.

IMG_7060

“Study III” (~60″ x 70″)

These were such fun exercises and the tops came together in a day. I am out of my creative rut but not my finishing rut….these pieces still need quilting. Sigh. I will need to get this done soon though as these will be samples for my upcoming QuiltCon class “PIE003 Scrap Diving”. 

So, (the plug :-))…..if you are in a creative rut or have lots of larger scraps (say up to a fat eighth) or want to create a quick quilt – sign up for my class. The QuiltCon catalog is available here and registration starts end of June.


Tread {a finish}

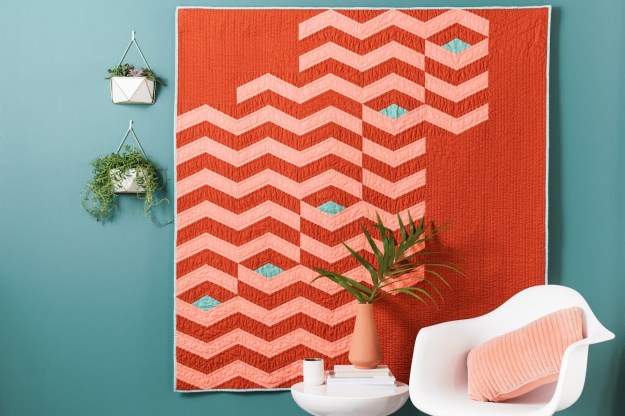
The design for this quilt, Tread, was originally created as part of an article for the Modern Quilt Guild (MQG) on finding elements and designing a quilt. I was lucky enough to be asked to make it a realty, using a specific color palette in Moda’s Bella Solids. This quilt is now available as a pattern to MQG members as part of Modern Monthly, and will be the feature quilt for June.

IMG_6985

Photo Courtesy of The Modern Quilt Guild (Photographer: Austin Day, Stylist: Lauren Day)

The original inspiration was this cog and spoke machinery, that I had captured at the Shantytown Heritage Park a couple of years ago. I was fascinated by the arrows of the cogs, to think that these interlock and make something move… just loved the pattern and shapes.

DSC_0354

Not my usual color palette but I grew to love this supplied color palette (Rust, Coral, Teal with backing and binding fabric Zen Chic’s Day in Paris). The batting was also supplied by Quilter’s Dream which I had not used before but really enjoyed the low loft. The quilting was done in 50wt Aurifil 2420 (light Coral color). I shadowed the zigzag and used some extra ghosting in areas for interest. In the larger negative space areas, I just used vertical 1/2 in. straight line quilting.

Modern Quilt0220

Photo Courtesy of The Modern Quilt Guild (Photographer: Austin Day, Stylist: Lauren Day)

I was so pleased when the MQG posted the pics of this project, for:

  1. I was finally finished with the quilt. I had stitched this quilt in a period of a creative block and in midst of over commitment with craziness at work, additional travel and prepping for teaching my first time at QuiltCon. It was such a relief to see this done
  2. The staged pictures that the MQG produced (see captions of photos for photography and stylist) were just amazing. I mean look at the wall and how much it makes this quilt pop !!! Amazing!!

As I marked my quilt with chalk, I had to give a spin in the washing machine and dry it. I love that finish crinkly look of this piece.

Details

Name : Tread
Design:
 Original Design, Inspired by Cogs
Fabric: Moda Fabrics, Bella Solids – Rust, Coral and Teal
Binding: Moda Fabrics, Zen Chic, Day in Paris (Teal)
Dimensions: 60 x 60 in.
Quilted: With 50wt Aurifil 2420 (Coral), using domestic machine walking foot, straight lines.


Community {Part II – Group Activity}

Part II of my community posts is about how you can foster your community with your own group activity, in this case a traveling quilt.  This past year, I had the amazing pleasure to work with Melanie, Valerie, Melissa, Jen, and Sarah in a traveling quilt group. I knew all these wonderful people before we formed this group and knew that we had similarities and an interest in modern quilting. I think its important to work with a group of people you know and and have common things like style, fabric choice and techniques.

Traveling Quilt Concept

How the traveling quilt group worked….well,  we each created a starter kit that described a theme and what we wanted to receive. This kit included:

  • A journal that described the theme, color palette, styles or techniques you wanted. Each person was to add their thoughts around what they created to the journal as it travelled.
  • A “starter” which could be a block or a row in the theme and colors that you chose, so that the person can have an example to work with.
  • Some additional fabric to work with, though folks could add their own as they created their work.
  • Some included a small gift but it was not mandatory.

fullsizeoutput_e1c
Each person (as there were six of us) had two months to add to the quilt. We knew life would get in the way so timings were flexible. Note though, communication was important and if you were late you needed to let folks know where you were up to and how late were you going to be.

Let me take you through a year in our traveling quilt experience (also check out #travelingstitches2018 for more progress shops by others in the group)

My Theme

So before we talk about my theme and project let me give you a little bit of an introduction to me, which I seldom share.

Many of you know I grew up in New Zealand, but I really have not shared my experiences of growing up. My parents were very young when I was born (Mum 18, Dad about to turn 21). They were just starting out, and their first house was in South Auckland, Papatoetoe. I loved growing up in Papatoetoe, and appreciated the education I got, the friends that I made and the opportunities extended to me (Schools: Papatoetoe South Primary, Kedgley Intermediate and Aorere College). What I didn’t realize, until I moved away from New Zealand, is what an amazing multi-cultural experience I was exposed too growing up here. To me this was just the community I belonged to and was welcomed into, it was Whānau. Exposure to the arts of each of the cultures – Maori, Samoan, Raratongan, Tongan, and Fijian has definitely influenced my design and quilting styles.

So what was my theme for my traveling project – was on Maori design. My goal choosing this theme was to share a little bit of my home with everyone and introduce them to a new language, culture and design aesthetic. Aspects that needed to be incorporated in their designs: geometry, black+white+splash of red, no improvisation.

fullsizeoutput_e23

My starter blocks were of a triangular design 60″ long representing a Tukutuku panel from a wharenui (Meeting house) and a design inspired by a Moko (tattoo).

IMG_2365

After a year, you get back all your blocks. I was so impressed, everyone did an amazing job. I laid out all the blocks and worked on the final design for the top. This process was extremely emotional but helped me work through a lot of feelings around the Christchurch terrorist attack, that had occurred 3 days previously.
IMG_6856

Melissa

Melissa’s theme “Ode to the Rhombus”, was inspired by Josef Albers Ode to the Square and his interaction of color. She chose an amazing color palette mostly greens with some dark blues. It was such a fun project, I immediately had a plan and inspiredly our bathroom fan.

img_2452.jpg

With the blocks, I explored the impact on how colors interact with each other and enjoyed the discoveries along the way.

Melanie

Melanie’s concept was about interpretation. She provided everyone with the same instructions, but how you interpreted them was really up to you. At the time of reading the instructions, I was feeling like exploring maximalism within minimalism. Yes, my blocks are the ones where the white strips appear very wide (chunky). By using just black and white you could really see how interpretation played such a large role. At this point, Melanie, Melissa and I had contributed blocks.

IMG_4104

Jen

Jen’s project was one of the most challenging for me. She wanted us to investigate who we are and design blocks thinking about your soul and expression…..and using a yellow only palette!! As I thought about this over a course of a couple of weeks, two ideas emerged. One, that I wear my heart on my sleeve (I could never play poker). This idea was represented by having the seams visible (middle bottom block).

The second idea started with the fact I am a true introvert, most people just don’t realize it. The window block on the right, has the window frame (white) disappearing into the background….and that is so me in a group setting, especially with people I don’t know or a large group. More importantly, while making this block, I realized that I do like being in the background.

Valerie

Strips in navy, white and pops of yellow was Valerie’s theme. I played with a log cabin them and deconstructed it in a few different ways to come up with these blocks.

Choosing the navy as the negative space, I thought was important to the overall balance of the blocks that had come before me (Valerie, Jen, Melanie, and Melissa).  Here is what all the blocks looked like when I passed it off to Sarah – the lucky last to add to Valerie’s quilt.

IMG_5080

Sarah

Lastly, I got to add to Sarah’s quilt. Her theme was outdoor open spaces in the west and she talked about how inspired she was by Utah, Arizona etc. As I had just spent a week at the National Parks in Utah, I did not have problems coming up with inspiration.

The cairns block on the left is appliquéd and inspired by Leon Polk Smith’s work. The mountain block (right), I really wanted to added layers to the foreground to represent the soil or the modified vegetation. I thought this tied in Sarah’s job as an archeologist.

Fostering community with Group projects

This was such a fun activity and I can highly recommend it, but choose your participants carefully. Other ideas for group projects:

  • Choose a theme, and color palette, and just have folks send blocks to you instead of making it a traveling quilt or round robin like activity.
  • Organize a group to explore concepts with each other fostering feedback etc.; Quilt Design a Day for example (more on this later)
  • Charity quilts – making charity quilts for a common cause always pull people together.
  • Sew-ins or quilting bees or retreats with friends or guild members (more to come on this as well)
  • Instagram events like quilt alongs, or daily practice activities (#100days)

Also, don’t forget fostering your community does not always have to be sewing related. Try setting up just social events with your quilting community:

  • A potluck lunch or dinner.
  • Picnic at a local park with family included.
  • Visit an exhibit together at a museum, quilt show or state fair.
  • Movie night, this maybe at a local outdoor event, or rent “How to make an American Quilt” (still with a quilt theme).
  • Met at a local bar, restaurant or cafe.
  • Try other art activities together like pottery or art+wine.

These are just some ideas I have tried. What have you all tried to do as a group to foster your quilty community?

Community Posts:
Community Introduction – Part I