San Francisco Bustle {a finish}

I am so happy to share this quilt, finally. San Francisco Bustle is this months MQG Quilt of the Month and the pattern is available to all members here.

SF_Bustle_quilt_label

Last May (2016), I posted a spark for the Quilt Design a Day Facebook group of a Cable car stop in San Francisco.
fullsizeoutput_a88

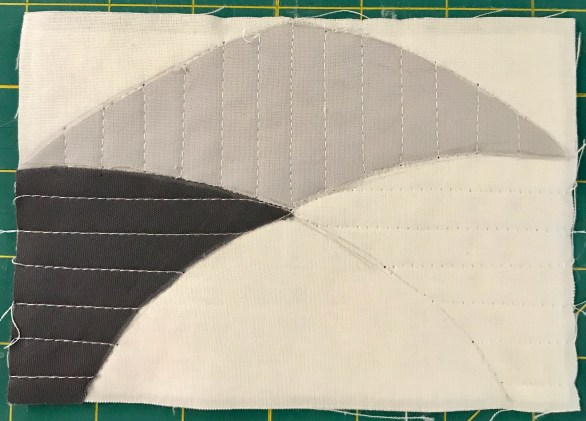
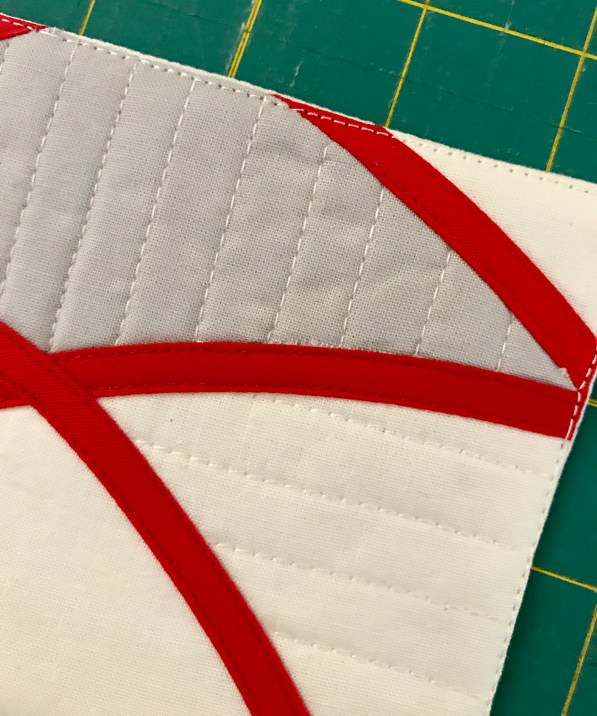
From this image, I designed this minimal abstract quilt design. The blues are from the cable car, the orange from the cones, the yellow from the road markings and the grey from the footpath corner. I will say the top grey box was a mistake and was out of my sketch pad but when saving it, it showed up. I loved the balance it provided and left it in.

SF_Tram_design

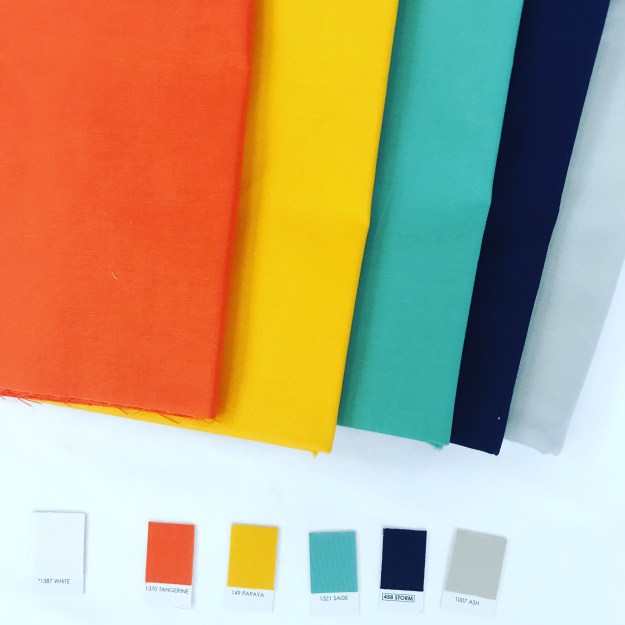
I used all Kona Cottons for the quilt, and love this palette (White, Tangerine, Papaya,  Sage, Storm, Ash). I am sure I will use it again in future.
IMG_8525

The piecing went quickly and I had the quilt top finished in about 3-4 hours. Then I got stuck. I had no clue how to quilt it. Thanks to friends encouragement, I got past the block. The quilting is a variety of straight line designs, done on my domestic sewing machine. You can really see the quilting in this picture in the direct sunlight.

SF_Bustle_Quilting
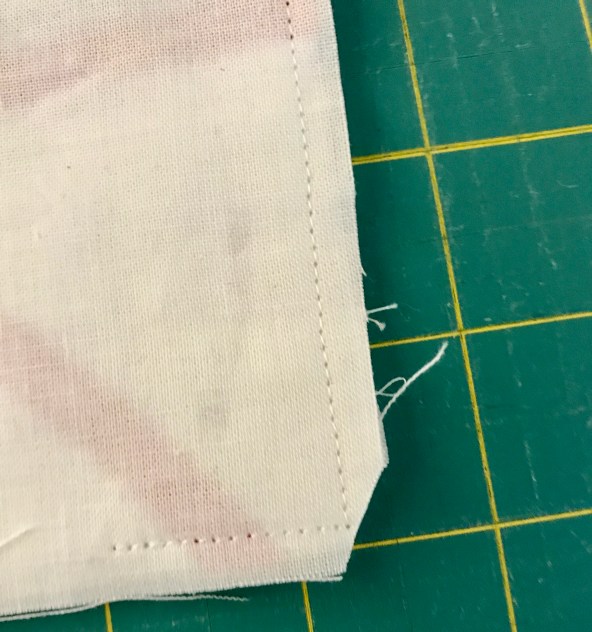
The binding, which I am in love with, is block matched with the shapes that are along the edge. I thought about doing faced binding for the first time but really wanted the straightness and sharp corners of traditional binding.

Details

Name: San Francisco Bustle
Design:
Design by myself
Fabric: Kona Cotton (White, Tangerine, Papaya,  Sage, Storm, Ash)
Backing: Heather Givans, Literary, Pages in New and scraps
Binding: Kona Cotton (White, Sage, Storm and Ash)
Dimensions:  68 x 75″
Quilted: Variety widths and directions straight lines, domestic sewing machine with Aurifil


Quilted Postcards {Tutorial}

fullsizeoutput_23ff

In my previous post, I shared my current experiment with quilted postcards. I make a finished 4 x 6″ standard sized postcard. Here is the list of materials and the instructions which start after you have a finished 4 1/2 x 6 1/2″ postcard front.

Materials

  • One (1) 4 1/2″ x 6 1/2″ pieced front
  • One (1) 4 1/2 ” x 6 1/2″ backing fabric
  • One (1) 4 x 6″ Fusible Fleece (like Pellon 987F) or
    Two (2) 4 x 6″ SF101 Pellon ShapeFlex
  • Thread for piecing/quilting
  • One (1) Adhesive Postcard back (purchased from Amazon.com)

Instructions

The postcards cannot be too thick otherwise you will not be able to use normal postcard postage so I use fusible fleece that is like a quilt sandwich or two pieces of Shape Flex interfacing (one on each side fused to the back and the top).

I have two ways of making my postcards. The first is not that different from a normal quilt, and can be seen in this image below. Take the postcard pieced top and baste to the fusible fleece, and then baste with a glue stick the bottom fabric to the fusible fleece. Quilt as desired, trim. Zig-zag or overlock the edge of the post card to finish.

Balance_Postcard

The second method, I chose since I was using bias tape and wanted to encapsulate the bias tape edges within the edge of the postcard. Here are the step by step instructions for this finish.

  1. Fuse the fusible fleece to the top of the pieced postcard top.fullsizeoutput_23fb
  2. Quilt the top with the fleece as desired and add the bias tape to the front.fullsizeoutput_23f9
  3. Place the top and back right sides together (RST). Stitch a 1/4″ seam around the postcard edge, leaving a two inch opening along one edge.fullsizeoutput_23f7
  4. Cut the corners inside the seam line, removing the bulk in corners. fullsizeoutput_23fc
  5. Turn the postcard inside out, using a chop stick or pencil end to push the corners out.
    fullsizeoutput_23fd
  6. Press the postcard edges, to position the seams folds correctly. Top stitch the edge of the postcard. fullsizeoutput_23fe
  7.  To finish the postcard, take one of the adhesive postcard backs and place it on the back side of the fabric.
    fullsizeoutput_2400

The other size you can consider is a 5 x 7″ postcard and you will need to purchase the appropriate adhesive backs.

Let me know if you have any questions. If you make any postcards I would love to see them on Instagram – just tag me @ml_wilkie or use #quiltypostcards.


Quilted Postcards

I had a goal for September to make 30 postcards in 30 days (#30daysofpostcards) and have been sharing over on Instagram. Well, I will have 30 but it will take me more like 60 days. It has been the greatest experiment to play with 4 x 6″ quilts. I love it as I get these ideas all the time, and this size allows me to play but not invest too much time, to see if it works or not.

Right now, I am at 29 postcards. I am sending around 17 of them off, as postcards, to people who wanted to receive one. They in turn will send one postcard to someone else. I love the idea of sending a traditional note, a piece of mail, with a little quilty inspiration.

The first postcard that kicked it off was inspired by my effort in finding balance. The line representing balance and the quilting about finding the positives. I had to use my wonder women stamps in this pic., it seemed fitting.

Balance_Postcard

I have a couple of other book project ideas rolling around in my head. I experimented with both ideas and will likely move forward with these as book projects.

The first is a project based on the plastic construction fences.
PlasticFence_Postcards

The second an improvisational triangle idea that is based on airplanes. ImprovTriangles_Postcard

With these next two postcard, I had vivid shapes pop into my head that I could not shake. The first being a Square with a cream border on one side, and one half made up of two triangles at various heights and dimensions. I played with the white and cream solids, stripes and black linen for interest.

Minimalism2_Postcard
The second shape was split across 4 postcards, where each had a corner of a square. One of the corners was a 1/4 circle instead. In my head this 1/4 circle was also the opposite in color combination. I had not envisioned a color combination but decided when making it to do it in a navy and bright yellow. This is my favorite combination and will likely become a much larger quilt at some stage.
Square_Circle_Postcard

For the longest time, I have admired Erin Wilson’s work (@erinwilsonquilts) who does amazing line work in her quilts. These last postcards were my study of lines. I still need to quilt these two.

LinesStudy_Postcard

I have loved playing with this size that I think I might do another round, but this next one will be a cohesive collection vs. random experiments. I am thinking of playing with minimalism or just with lines in a specific color-way. The idea is still forming.

PS. If you are living in the US, I was very surprised with some of the great stamp collections the USPS (US Postal Service) has at the moment. I went a little crazy in purchasing a few, so I am thinking my son can now collect stamps ;-).

PPS. In a couple of days, I will post a tutorial so that you too can make your own quilted postcards. I am just finishing editing the photos.