Category Archives: tutorials

Scrappy Star Blocks {Tutorial}

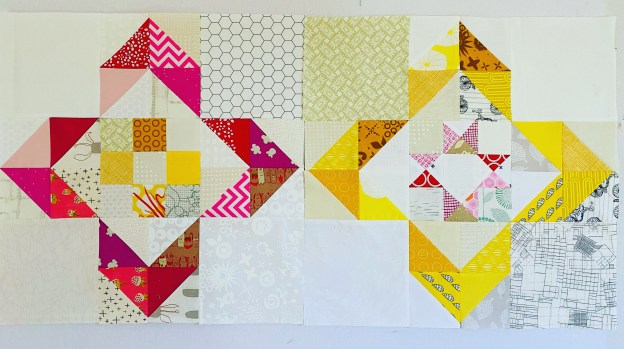
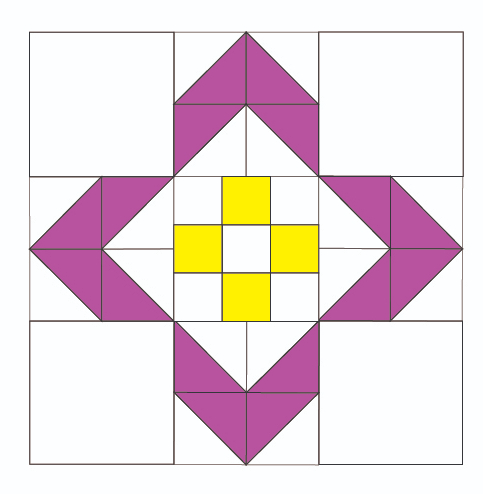
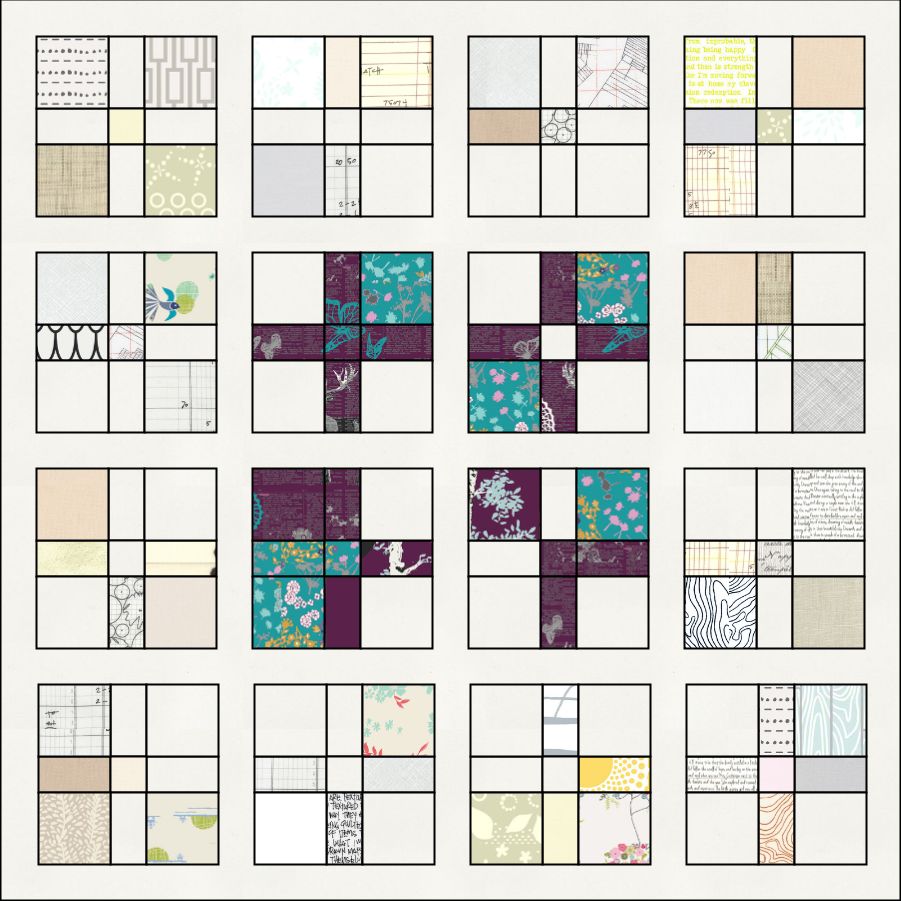
These blocks were inspired when looking at some vintage block combinations. I was thinking about making a gift our of scraps, specifically pink & yellow fabrics with scrappy low volume backgrounds. My goal is to alternate the blocks and make a twin sized quilt (4 x 5 blocks)

Block 1 is made with a simple 9-patch center. Block 2 is made with an Ohio star center. They measure 18″ finished (18 1/2″ unfinished).

Notes:

HST = Half Square Triangle
RST = Right Side together
All seam allowances are 1/4″

Cutting Instructions for each block

Block 1 (9-patch center):

  • Five (5) 2 1/2″ low volume squares
  • Four (4) 6 1/2″ low volume squares
  • Eight (8) 4 1/2″ low volume squares
  • Eight (8) 4 1/2″ pink squares
  • Four (4) 2 1/2″ yellow squares

Block 2 (Ohio Star center):

  • Five (5) 2 1/2″ low volume squares
  • Four (4) 6 1/2″ low volume squares
  • Eight (8) 4 1/2″ low volume squares
  • Two (2) 3 1/2″ low volume squares
  • Eight (8) 4 1/2″ yellow squares
  • Two (2) 3 1/2″ pink squares

Construction of the Center Blocks

Block 1 (9-patch center):

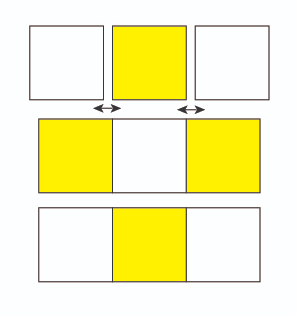
  1. Layout the 9 patch square by using the five (5) 2 1/2″ low volume squares and the four (4) 2 1/2″ squares. The low volume and yellow squares should alternate starting with a low volume square in the corners and center of the block.

  2. Stitch together each of the rows of three blocks. Press seams.
    Note: I press open as it lays flatter and I find it easier to match the seams.

  3. Once all three rows are stitched, sew them together matching seams and pinning in place while stitching. Press seams.

Block 2 (Ohio Star center):

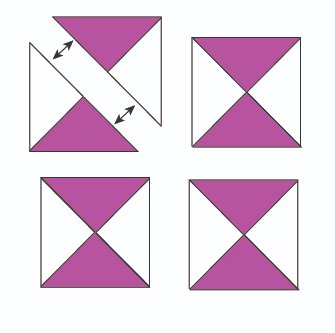
  1. Start by making quarter triangle squares. Take the two (2) low volume and on the back side, draw a diagonal line between one set of corners.
  2. Place the low volume square and the pink 3 1/2″ squares RST.

  3. With the low volume back facing upwards, so you can see the line, stitch a seam on either side of the line.
    Note: I chain piece these, and do all one side first and then the other.

  4. Cut along your drawn line with a ruler and rotary cutter. You should now have two (2) HST from each set of 3 1/2″ squares. Press seams.

  5. Using a ruler and rotary cutter cut these squares in half along the opposite diagonal that is pieced. You should have 8 half pieces.

  6. Match up the halves from all the blocks so that the color triangles are diagonally lined up. Put triangles RST, match the seams in the middle (along the longest length) and pin. Stitch together to make 4 blocks. Press seams.

  7. Lastly, trim the blocks to 2 1/2″.
    Note: I use a square ruler with a 45 degree angle line (see image below in next section #5). I line up the 45 degree line with one of my seams and trim all 4 sides (2 at a time), making sure I don’t cut it smaller than 2 1/2″ (you should have at least 1/8 inch to trim for each side).
  8. Follow the steps above for Block 1 to now make a 9-patch (instead of yellow use the pink quarter square triangles). The layout, I use, is as follows.

Construction for HSTs

  1. Take the eight (8) 4 1/2″ low volume squares and on the back side, draw a diagonal line between one set of corners.
  2. Place the low volume square and the pink or yellow 4 1/2″ squares right side together.

  3. With the low volume back facing upwards, so you can see the line, stitch 1/4″ seam on either side of the line.
    Note: I chain piece these, and do all one side first and then the other.

  4. Cut along your drawn line with a ruler and rotary cutter. You should now have two HST from each set of 4 1/2″ squares. Press seams.

  5. Trim all HST to 3 1/2″.
    Note: I use a square ruler with a 45 degree angle line. I line up the 45 degree line (as shown below) with the seam and trim all 4 sides (2 at a time), making sure I don’t cut it smaller than 3 1/2″ (you should have at ~1/4 inch to trim for each side).

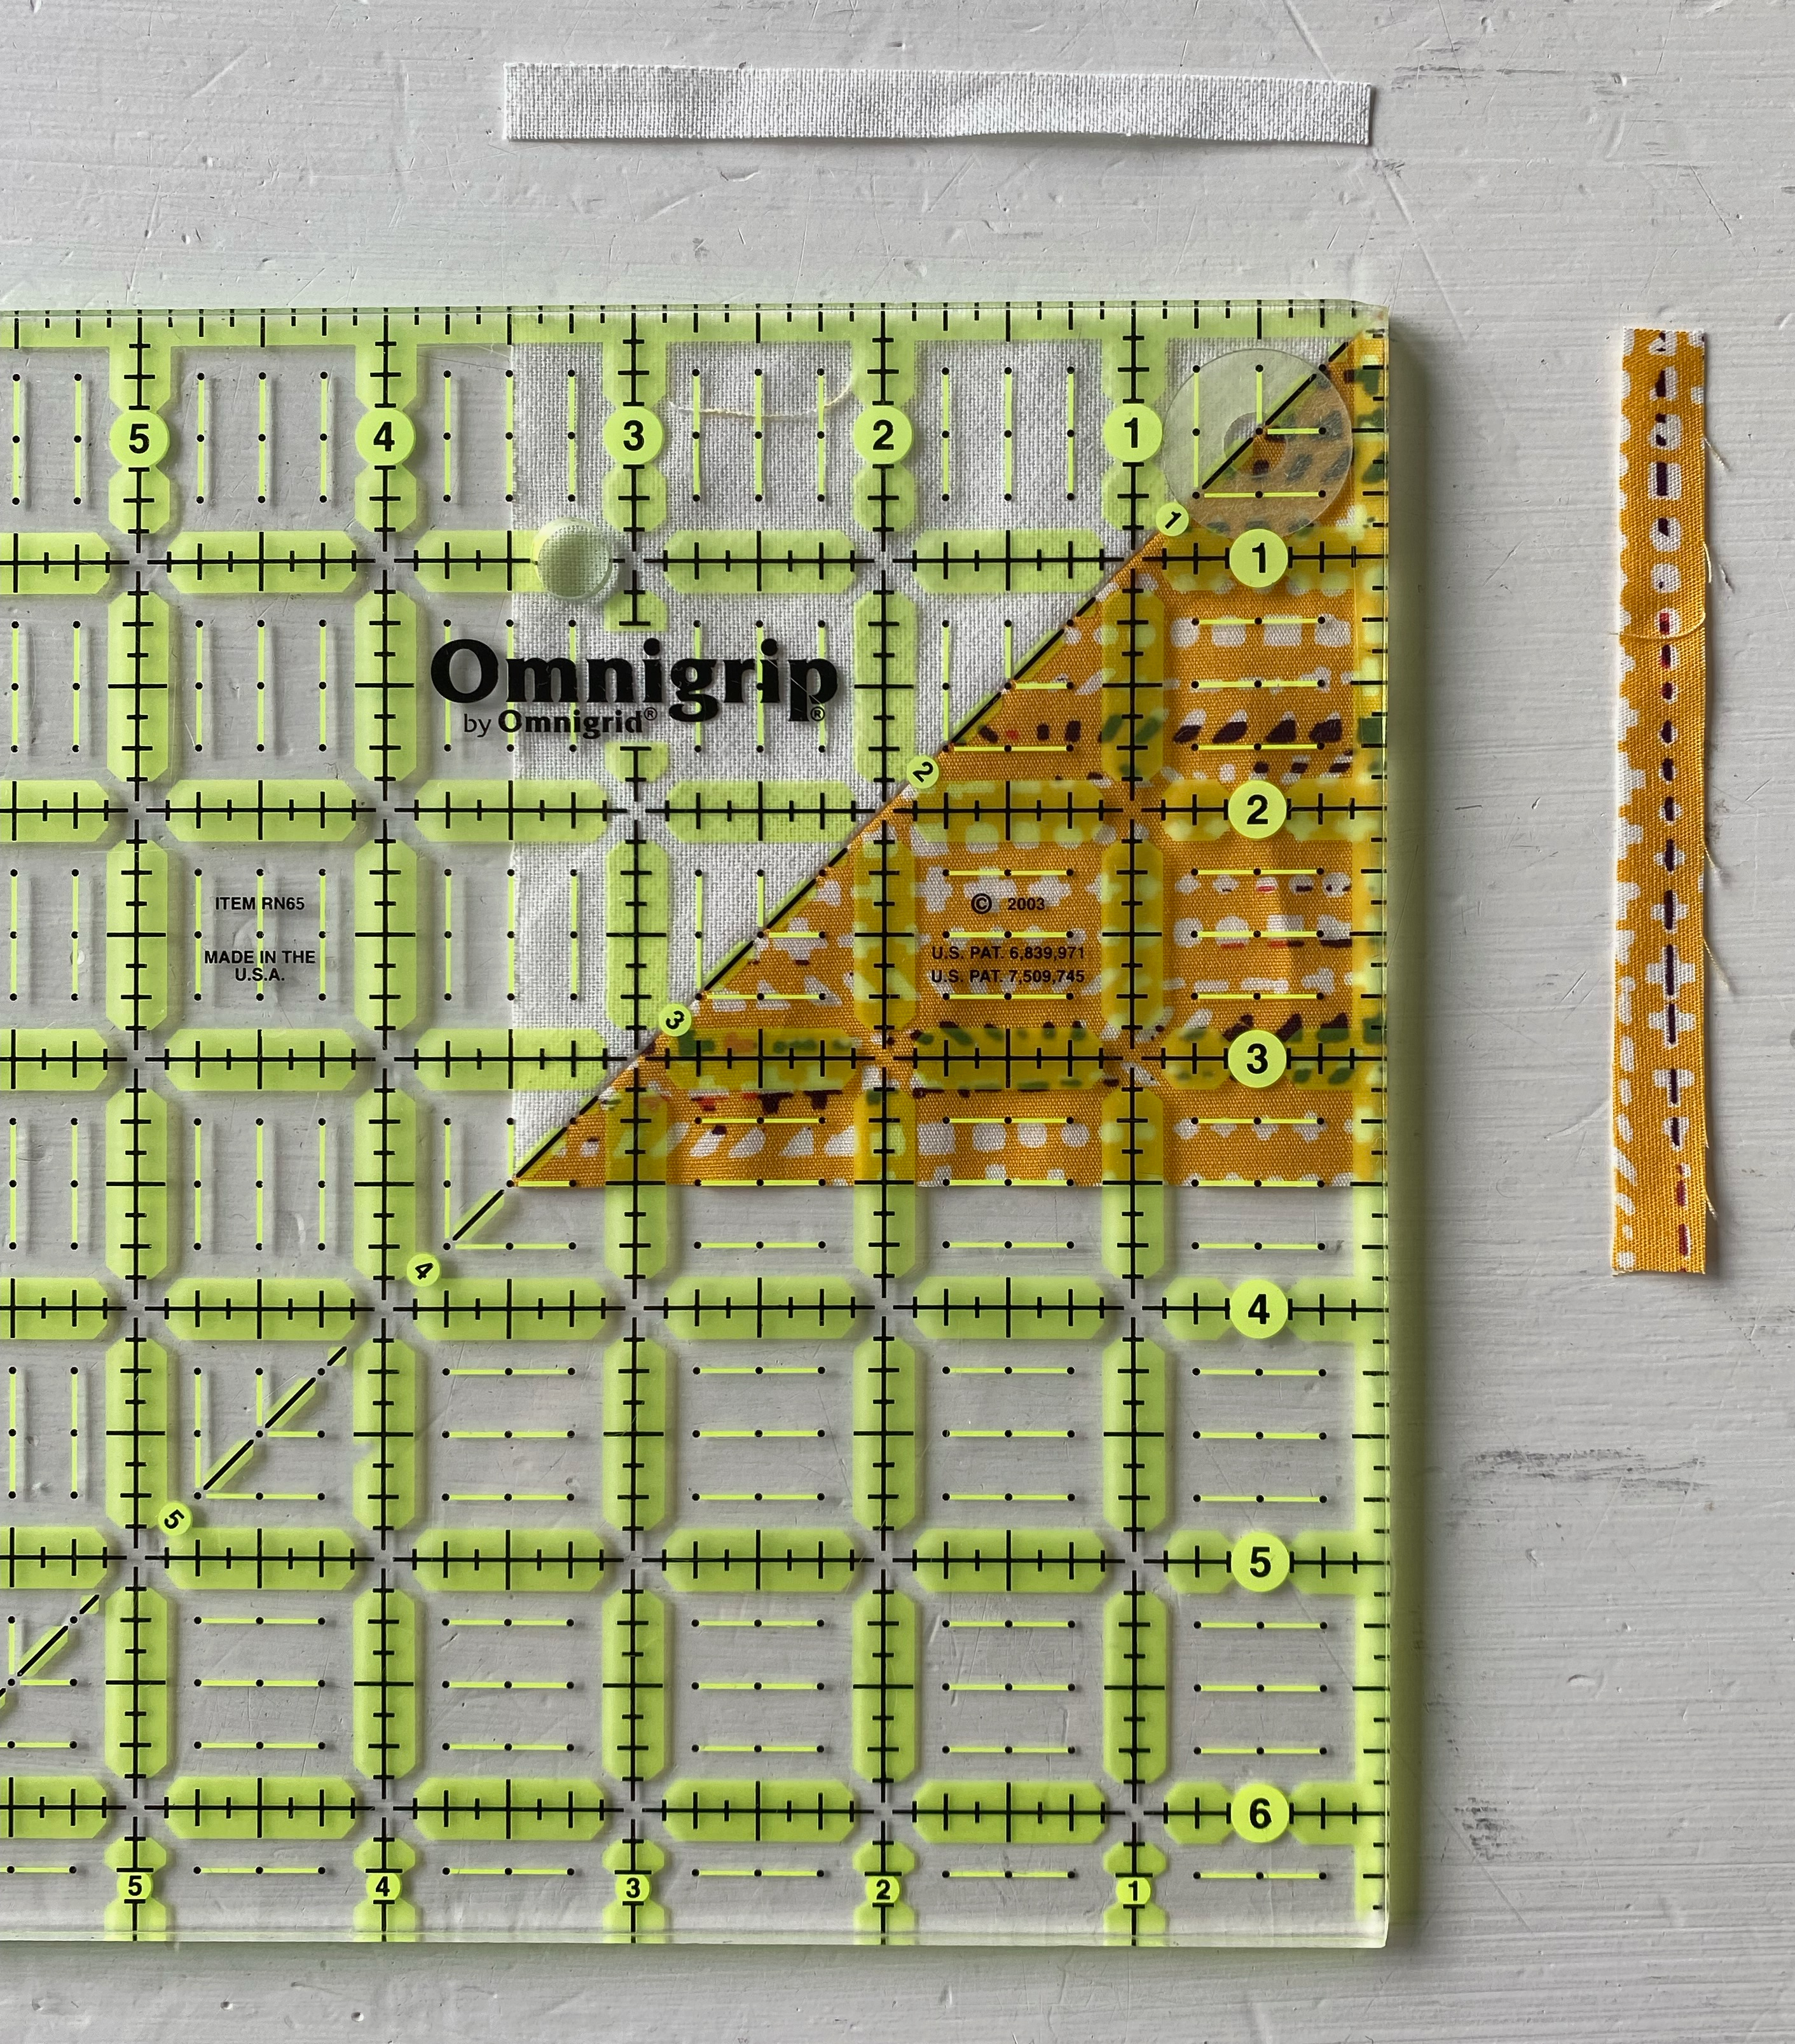
  6. You will now be making flying geese with the HST’s. Four will be with low volume in the middle and the colored print on the outside, and four with the color print in the middle and low volume on the outside.

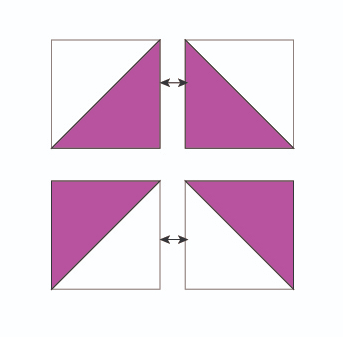
  7. Once you have laid out your squares, put them right side together and stitch them together using a 1/4″ seam. Make sure you know which side to stitch. Press seams open.
  8. Final step, is to make four (4) 6 1/2″ squares using one of each of the flying geese (white and colored middle triangles). Place the flying geese RST, along the long side, match the middle seam, so that your colored squares are forming an arrow. Stitch together.

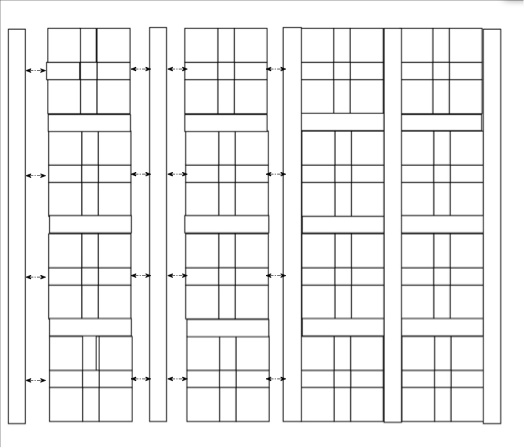
Construction for Final Blocks

  1. For the final construction you are essentially making another 9-patch square. Place the four (4) 6 1/2″ low volume prints at each corner, in the middle place the center block (smaller 9-patch or Ohio Star) and then in the space place the arrow block (the pink or yellow HST block).
  2. Stitch together each of the rows of three blocks. Press seams.
  3. Once all three rows are stitched, sew them together (with RST) matching the two seams and pinning in place while stitching. Press seams as you go.


Enjoy the tutorial and let me know if I need to clarify anything. I would love to see your blocks if you make any. Tag me on Instagram @ml_wilkie and use #scrappystarblocks when you post or share.

Mod Squares {free pattern}

This is the second pattern I am releasing here as a free pattern, as it is no longer available on Sew Mama Sew (published 2014). Mod Squares is basically using a traditional 9 patch block, where I played with both size and color placement of the pieces.

This was an early quilt I had made (so not perfect), I think it was the first time I tried free motion quilting. It is, however, one of the most loved lap-quilts and lives in my son’s room. I hope you enjoy the pattern too, as it would make a great baby gift.

How it started…

The original color palette (Design Seeds) was very vibrant and strong, but highlighted different ways color can be used to make a block very different.

For this quilt though, I wanted a softer look. After playing with the fabric selection and introducing the use prints, low volume prints and several neutral solids, the look of the design completely changes. 

Quilt Details

Size: 54” x 54”

Terminology

WOF – Width of Fabric
RST – Right Sides Together
Seam Allowance: 1/4” seam allowance

Fabric Requirements

Fabric A (Variety of Low Volume Fabrics): 1 yard (largest 2 pieces must be 24″ square)
Fabric B (Variety of Neutral Fabrics): 1 yard (eg. Kona Cotton inBone, Parchment, Silver, Stone, White PDF, largest piece must be 24″ square)
Fabric C (Kona Oyster): 2 yards
Fabric D (Doiland Gloss in Plum, Indelible, Katarina Roccella): 1 yard
Fabric E (Floret Stains in Tealberry, Indelible, Katarina Roccella): 1/2 yard (18″ x WOF)
Backing fabric and Batting: 60” Square 
Binding: 226” (of your desired binding width, I use 2 1/4″) 1/2 yard

Cutting Instructions

FabricCutting Instructions
Fabric ATwenty-four (24) 5” squares
Five (5) 2 1/2″ squares
Fifteen (15) 2 1/2” x 5” strip
Two (2) 24” square (for the Back)
Fabric BNine (9) 5” squares
Three (3) 2 1/2” squares
Eight (8) 2 1/2” x 5” strip
One (1) 11 1/2” x 24” strip (for the Back)
One (1) 24” square (for the Back)
Fabric CTwenty-four (24) 5” squares
Five (5) 2 1/2″ squares
Twenty-seven (27) 2 1/2” x 5” strip
Two (2) 2 1/2” x 54” strip (for sashing)
Five (5)  2 1/2” x 50” strip (for sashing)
Twelve (12) 2 1/2” x 11 1/2” strip (for sashing)
One (1) 11 1/2” x 24” strip (for the Back)
One (1) 24” square (for the Back)
Fabric DTwo (2) 5” squares
Two (2) 2 1/2” squares
Thirteen (13) 2 1/2” x 5” strip
One (1) 24” square (for the Back)
One (1) 11 1/2 ” x 23 1/2” strip (for the Back)
Fabric E Five (5) 5” squares
One (1) 2 1/2″ squares
One (1) 2 1/2” x 5” strip
One (1) 11 1/2” x 24” strip (for the Back)
Table 1: Fabric Cutting Instructions

Preparation

It is important to plan your layout for your blocks. You can also available for download your own planning map here. Once you have your placement as you want it, take a picture.

Fabric Layout Map (by assigned letter)
Fabric Map Placement showing Print placement

TIP: Once you cut your blocks and decide on placement, pin and label all block pieces until you are ready to sew them together.

Block Assembly

  1. Each block consists of four (4) 5” squares, four (4) 2 1/2” x 5” strips and one (1) 2 1/2” square. The layout for all the pieces is represented below.
  2. Sew the pieces of each row  together. Press your seams. NOTE: My preference is to press my seams open.
  1. Sew the rows together (Row 1 to 2, Rows 1,2 to 3). Align the seams and pin in place to hold the alignment. Press seams. NOTE: To hold seam alignment in place, an alternative pinning method is glue.
  1. Repeat steps 1-3 for the other 15 blocks, keeping in mind placement of fabrics for each block.

Quilt Top Assembly

  1. Add the 2 1/2” x 11 1/2” sashing strips to the 11 1/2” blocks as depicted below. Press the seams.
  1. Add the 2 1/2” x 50” sashing strips to each of the block rows. Press the seams.
  1. Final step is to add the top and bottom 2 1/2” x 54” sashing strips to finish the top.

Quilt Back Assembly

  1. The quilt back is a larger version of the smaller blocks that are used in the quilt top. The back consists of four (4) 24” squares, four (4) 11 1/2” x 24” strips and one (1) 11 1/2” square. 
  2. To construct this block follow steps 1-3 above in section Block Assembly.
Back of quilt

Final Quilt Assembly

When the top and back are completed, baste and quilt your sandwich as desired. Square your quilt and bind it to finish your quilt.

This is a great quick quilt top to put together, perfect quilt for your sofa or for a kids blanket. Also, you can have fun with the fabric choices, color and placement. I would love to see the final quilts on Instagram, so feel free to share with #modsquaresquilt. Have fun!!

Submitting to a Magazine

I have now been submitting patterns to quilting magazines/publications going on 3 years, with at least 4-6 publications a year. I have been very lucky and have had great experiences with those I have worked with. Have you every thought about submitting to a magazine but not sure how to do it? Here are some pointers based on my experiences.

Submission process

  1. First step pick up a couple of issues of the magazines that you want to submit to. Check out layout, content, aesthetic. Make sure your project falls into their aesthetic.
  2. Start by checking the submission guidelines for the magazine you want to submit to. If you can’t find them, reach out via email requesting them.
  3. Depending on the submission guidelines, you may be required to submit a finished quilt or just design/ideas. I like submitting a couple of designs and offer to change size and color to make it easier to fit with an upcoming issue.
  4. It is important to submit the designs/or quilts to only one magazine/publication at a time. Don’t submit the same design to multiple magazines.
  5. The submission response varies for each magazine. I have had everything from 1-4 weeks. Communication maybe across multiple emails deciding on dates, and aspects of the pattern.

sunday-best

Quilt used for Best in Show, QuiltCon Magazine 2017

Contract process

  1. Once they say yes, they should send you a contract. Don’t agree to doing anything without a contract (I learned this lesson the hard way).
  2. If you can afford it, have a lawyer read through the contract and explain it to you.
  3. If you can’t afford a lawyer some of the key things you need to read are;
    • When do your rights get returned to you? It is common that this is 6-12 months for most magazines/publications.
    • What gets returned to you? Do you have the rights to re-publish? I like to get me rights back to then publish as my own pattern to sell. Rarely, but sometimes magazines will give you the rights to the images as well.
  4. Most magazines do not allow you to share on social media until the magazine//publication is on sale. When they are about to release, several publications will provide you with images to use. If they don’t ask if they can. You can ask if you can have the rights to those photos for your future use as well.
  5. Validate payments language and stipulations
    • Check when you receive the money, and the process of payment. Many will require you to submit invoice or purchase order. Others will need to receive the delivery before they pay. The other option I have seen is that payment will be made once the issue starts to ship.
    • How much are you being paid? This is typically negotiable, but if its your first publication you may want to balance experience and worth.
  6. Do they have terms in there for re-use? If yes, how much will they pay for re-use across other media and forms. Ask yourself if this is something you want. You may want to negotiate this.
  7. Terms and conditions are typically included on what happens if they choose not to use your project.
  8. Contracts may include and should include expectations on deliverables, timing and possibly shipping details.
  9. Shipping costs to the magazine, most will pay for the returning of the quilt, others may repay your shipping costs, you may need to pay it yourself. You will need to submit receipts for repayment.
  10. Some magazines have partnerships with fabric manufacturers and may be able to provide you fabric. I typically will use my own fabric for a submission but if this is something you are interested in, there is no harm in asking.

LQP_54_social_projectumbrella

Image Provided by Love Patchwork & Quilting

Delivery Process

  1. Make sure you understand what you need to deliver and when. It is important that you are on time with your deliverables. Life happens though, just communicate as early as you can and let them know the situation and most will work with you on any issues/delays etc. Communication is key.
  2. Most magazines will convey how they want the content delivered. They may provide you with templates and specific instructions. Make sure you follow the instructions.
  3. Mostly, I have written most of the patterns as part of the submission (see expectations for print) which is one of the deliverables. Some magazines may prefer to write it themselves. Check what your responsibilities are.
  4. I have seen that typically word is the preferred file format for the actual pattern  – if there is no template check out previous releases to get an understanding of what they are expecting.  You may want to include:
    • An introduction, quick blurb about your project.
    • Materials
    • Cutting instructions
    • Step-by-step pattern directions
    • Notes, Tips and acronym dictionary (if you used any, like WOF, RST etc. )
  5. For the instructional aspects, you may be asked for photos to illustrate your instructions. Make sure you check with the publishing body what backgrounds are OK, size of the file and make sure they are sharp and well lit.
  6. If you are asked to provide diagrams it maybe best to use illustrator and save the .ai files. Most magazines will have designers who are savvy in illustrator. They may require specific size work areas, file types and/or layers within illustrator.
  7. I will store all my soft copy deliverables in a google drive and share that link with the contact person to pick up. Keep an eye on your email in case something is incorrect or wrong with the delivery of the files.
  8. For the quilt, if you have agreed on techniques, color and size; if you decide to change any aspect you agreed upon communicate with your contact point and get mutual agreement on the change before moving forward with it.
  9. Make sure you know who is responsible for the photography of your quilt. Know when you have to ship it to get it there on time.  Understand how the quilt will be returned and ask for a tracking number so you know your quilt arrives on time.
  10. Ship your quilts following their instructions (if any are provided). Pack it in a plastic bag, include the invoice for the project, so they know which project it is for.
  11. You will likely need to also provide a headshot photo, and additional information about you like Instagram name, and blog.

lqp_43_p36-40_projectsherbert-front

Image Provided by Love Patchwork & Quilting

Expectations for Print

  1. The publishing company will edit your pattern, both from a formatting perspective and actual content. They need to fit it within their allocated space for the design, don’t be shocked if they have made major changes to the document you sent them. It is likely that you will not have a chance to review it.
  2. The publishing company will also use a graphic designer/ illustrator to modify your diagrams etc to ensure it matches their formatting and may combine or separate them into one or more diagrams. They may add to your diagrams.
  3. Until the quilt is scheduled to be released you may not hear again from the publishing body. You may not know if your quilt lands up on the cover until they send you a social media package….its all a very exciting.
  4. To promote your quilt ask for the photos you want, if you would like additional pictures…sometimes they don’t send all of them to you. I always ask for the staged quilt photo and the full front view of the quilt.
  5. The company will typically ship back your quilt once issue if released and most will provide you with a copy of the issue.

If this is something you want to do, don’t be afraid. The worse case is they say no. Now this shouldn’t be taken poorly, your quilt just might not be right for that magazine/publication. Try it with another magazine that may fit better. Best case you will have a quilt in an upcoming publication.

Please note, that these tips are based my experiences, and others may have had different experiences. Feel free to leave a comment if you have experienced something different so others can learn, or if you have other questions and I will do my best to answer it.