My first year sewing, I decided to make coffee cup sleeves for Christmas gifts and a Christmas fair. They were so successful, and after making about 40 of these, I thought y’all would enjoy them too.

Materials:
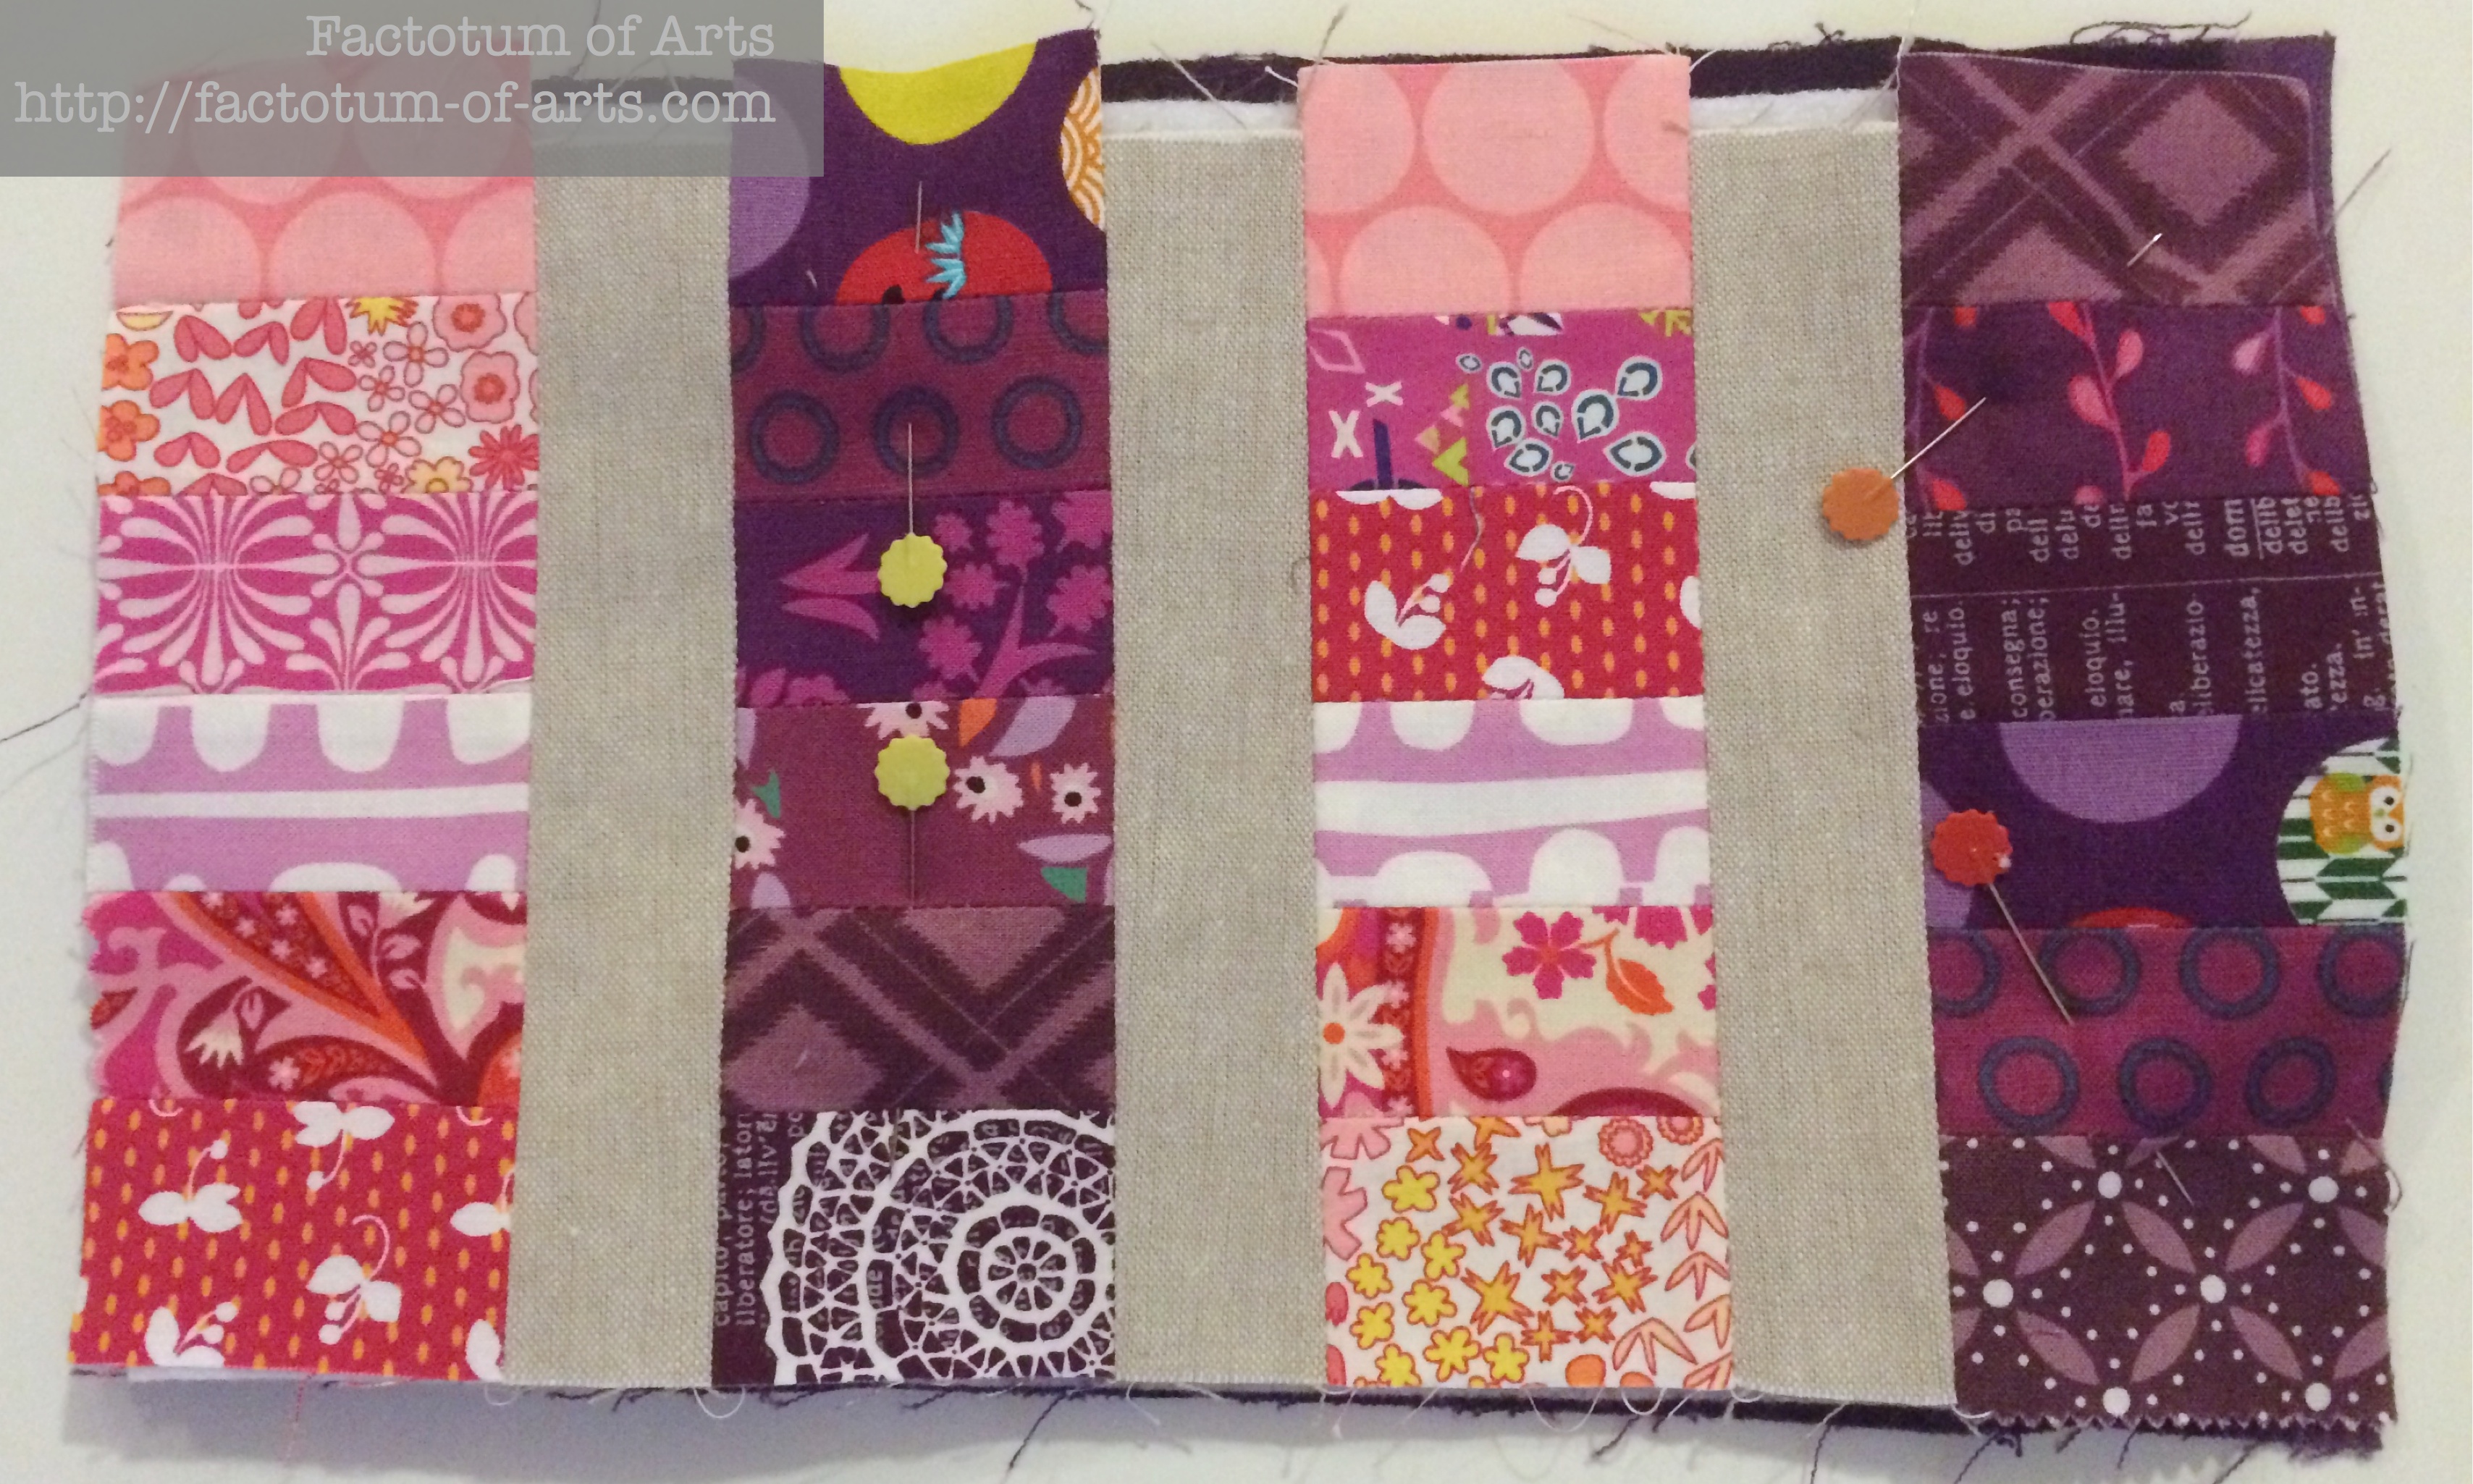
- 24 2.5″ x 1.5″ Scraps (I am using pink and purple scraps which could be any size)
- 3 6.5″ x 1.5″ Linen strips
- 1 6.5″ x 10″ Corduroy (for backing, you could also use felt)
- 2 6.5″ x 10″ fusible fleece ( you could use one piece fleece, one piece insul fleece; I use both pieces of fleece, so that I can use it for cold drink sweat as well)
- 1/4″ binding (Wrights double folded bias works well)
- 1 Elastic hair tie
- 1 button
- 1 Paper Coffee cup sleeve (use as template)


- Sew the 2.5″ x 1.5″ pieces into 6.5″ x 2.5″ strips and trim. Layout the your sleeve. Sew the scrappy strips together with the 6.5″ x 1.5″ linen strips. This will make a block of ~10″ x 6.5″.

- You now have 4 pieces to make your quilt sandwich. Iron one piece of the fusible fleece to the corduroy, the other to the scrappy block (front). Pin the layers together and trim the top edge, so that you have a good guide for quilting.

- Quilt the sandwich. I used my foot edge for even distance between the straight-line quilting.

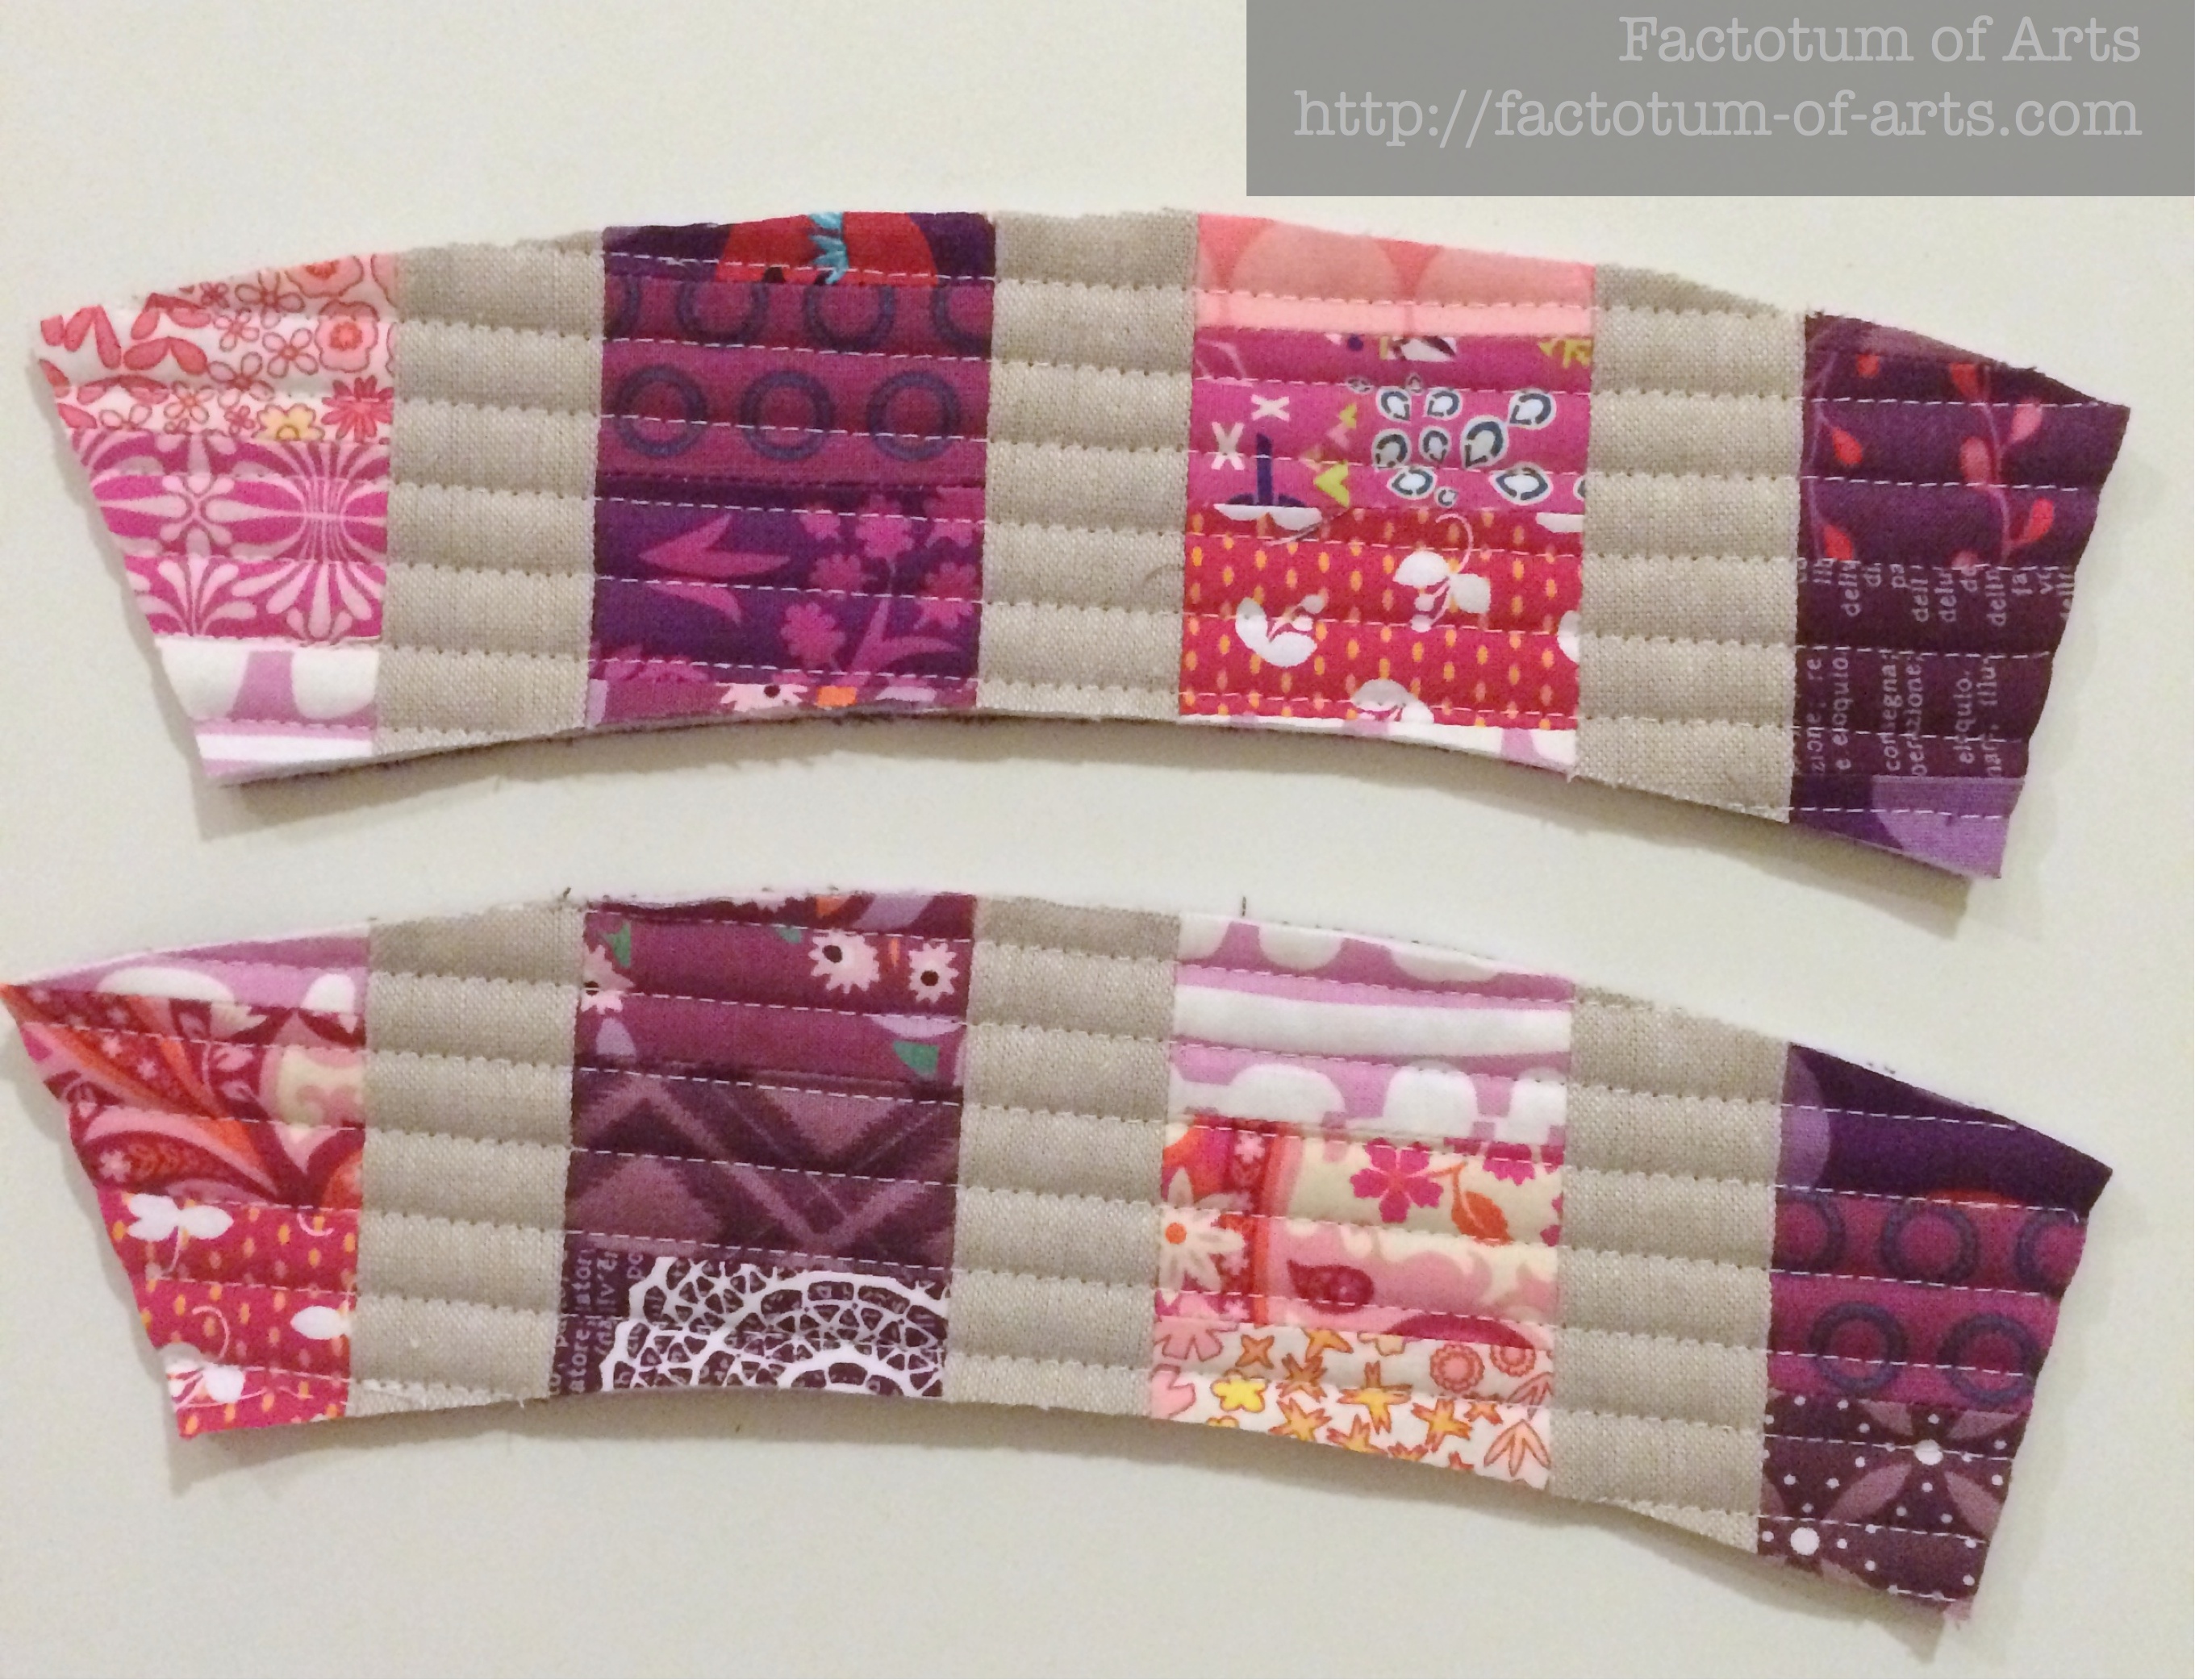
- Pin the template on the quilted sandwich. Cut out your coffee cup sleeve.

- You may actually be able to get two out of your block. Line the template up with the arc of the previous cut.

- You now have two sleeves.

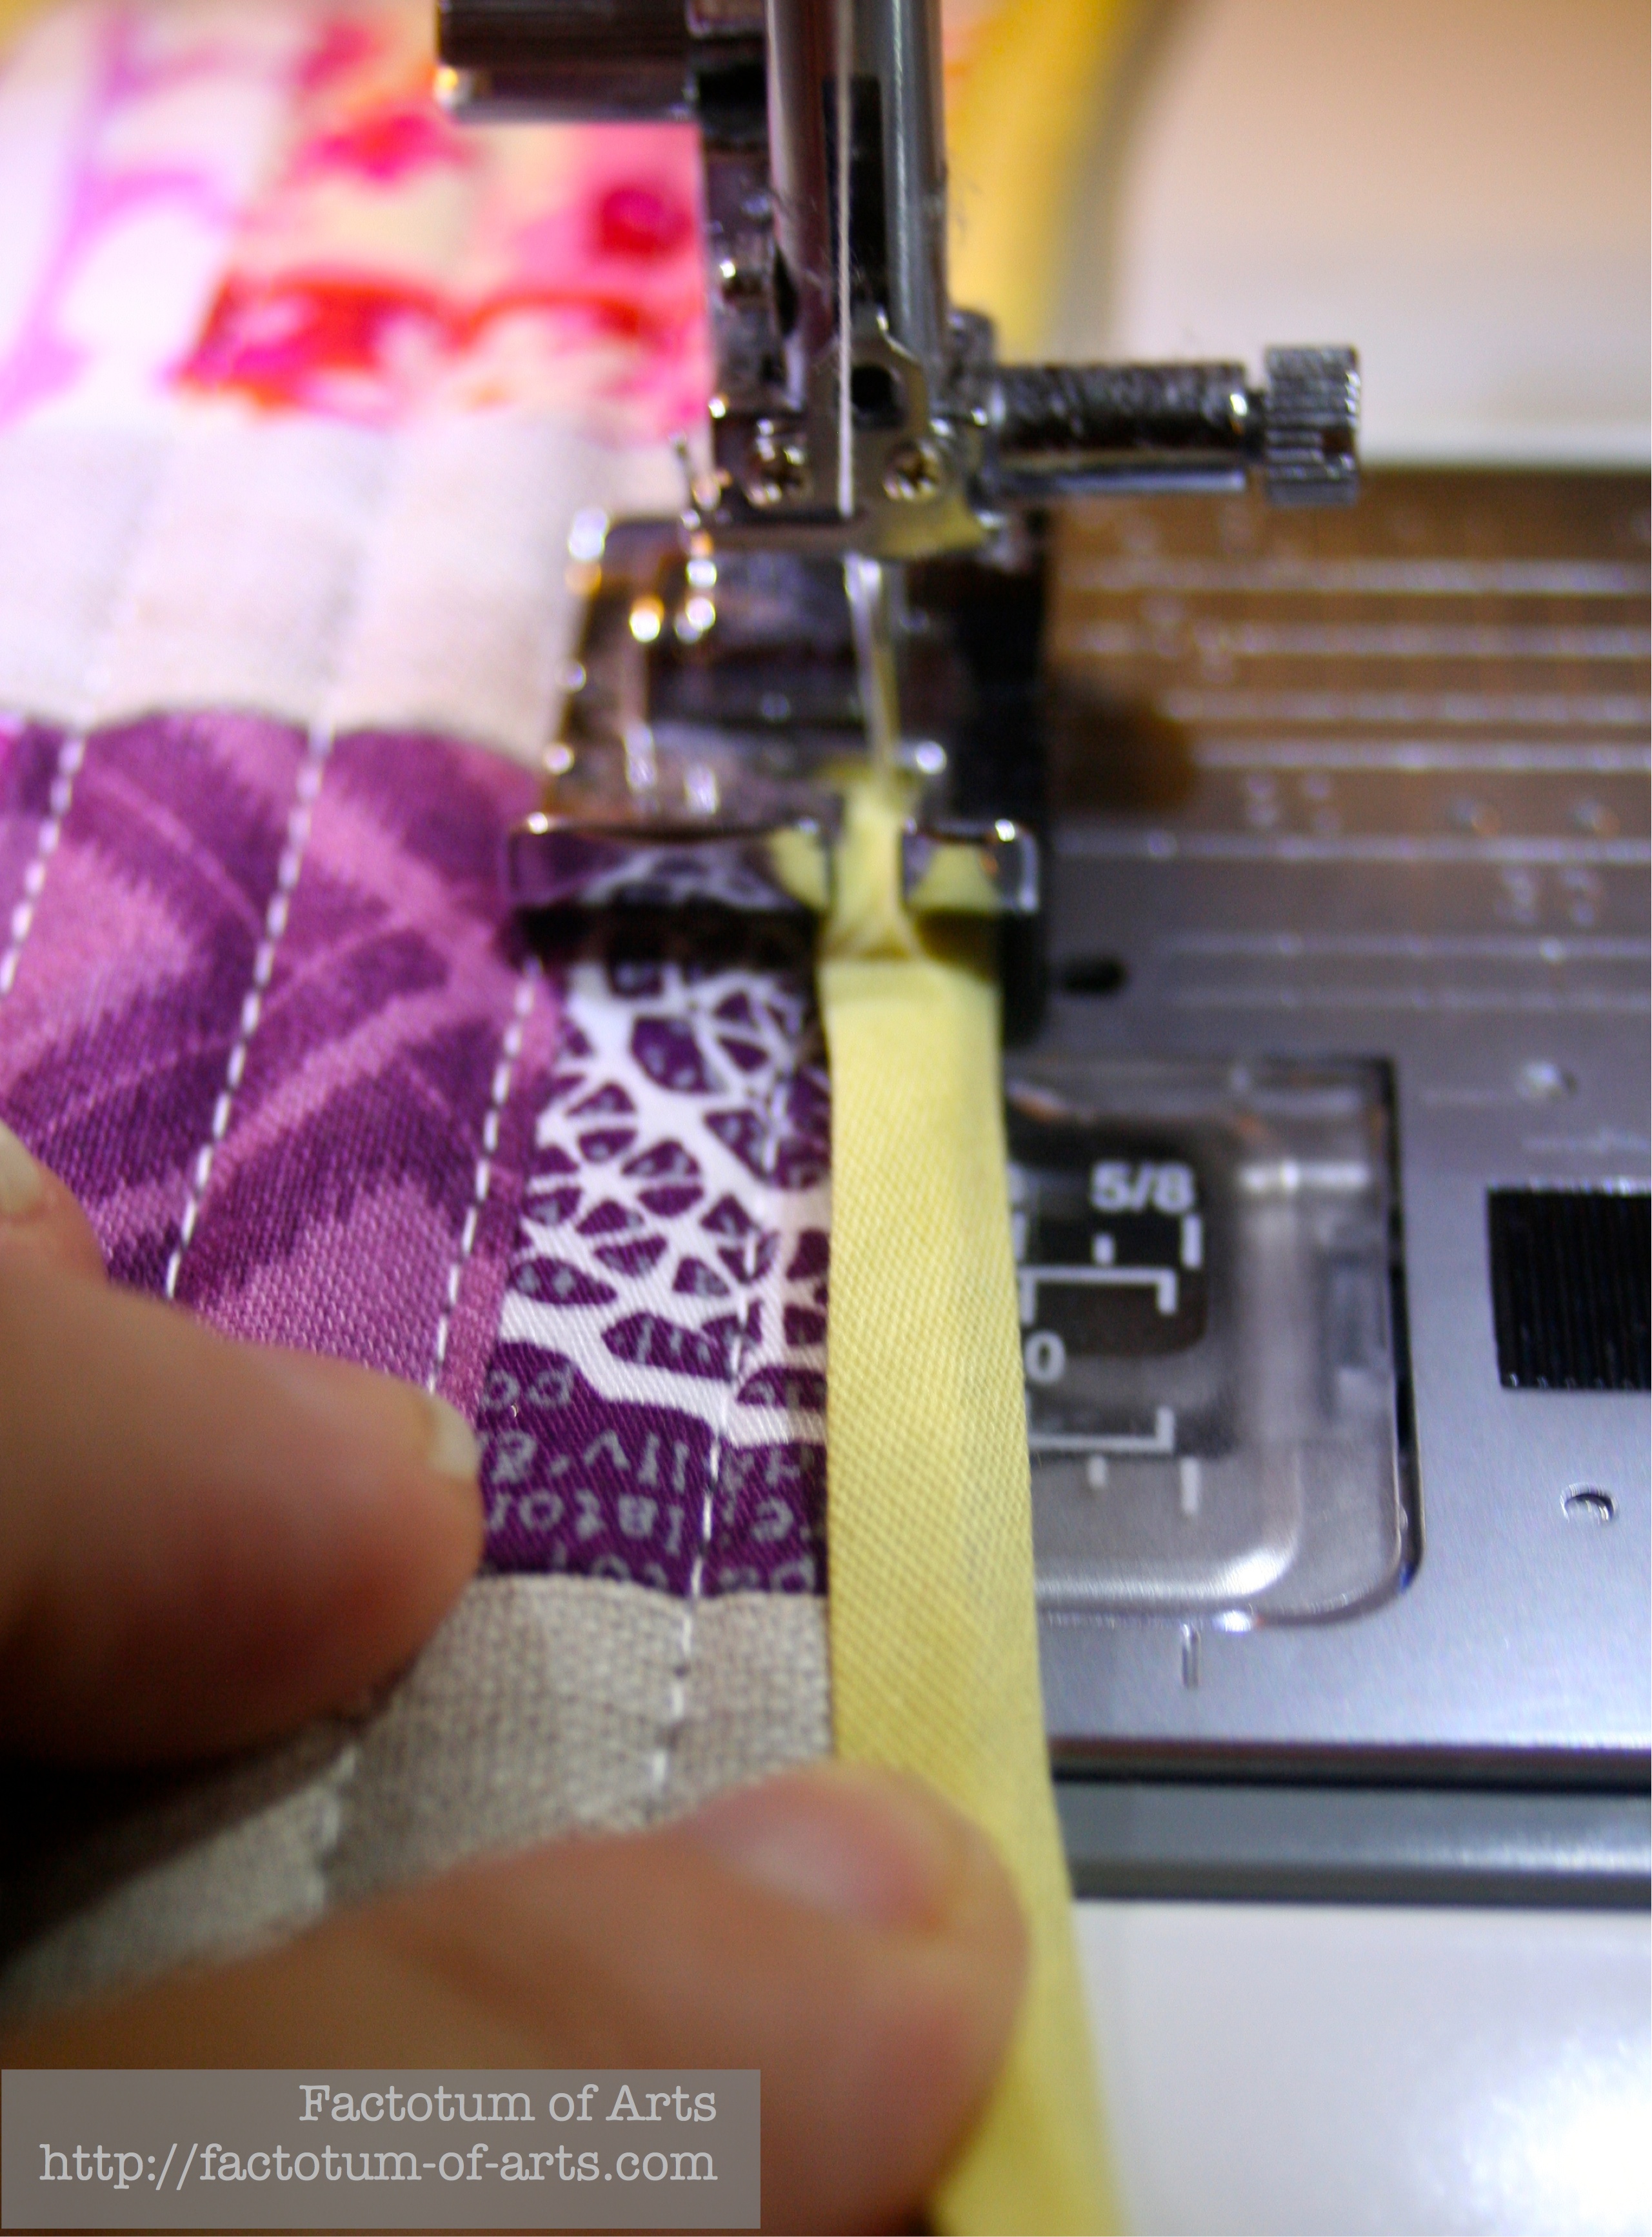
- Take one of the sleeves and the 1/4″ double folded bias. Open the bias folds, and iron the edge in about a 1/4″. This will be where you will fold the edges of the binding within itself.
- Use a machine binding technique with your sleeve, that means, you will start sewing the binding to the back. Unfold one edge of the binding and use the fold as a guide to your sew line. Sew approximately 1″ at a time, making sure you line up the edge of the bias with the sleeve edge. Use mitered corners.

- To finish up the binding on the back, overlap the edges of the binding about 1/4″ and sew. Unfold the bottom edge (leaving the 1/4″ “hem”), and nest the other edge, refold.
- Turn over the coffee cup sleeve and fold over the binding. Stitch about a couple of mm from the edge all the way around. At the corners make sure you make the mitered corners fold the opposite way of the back.

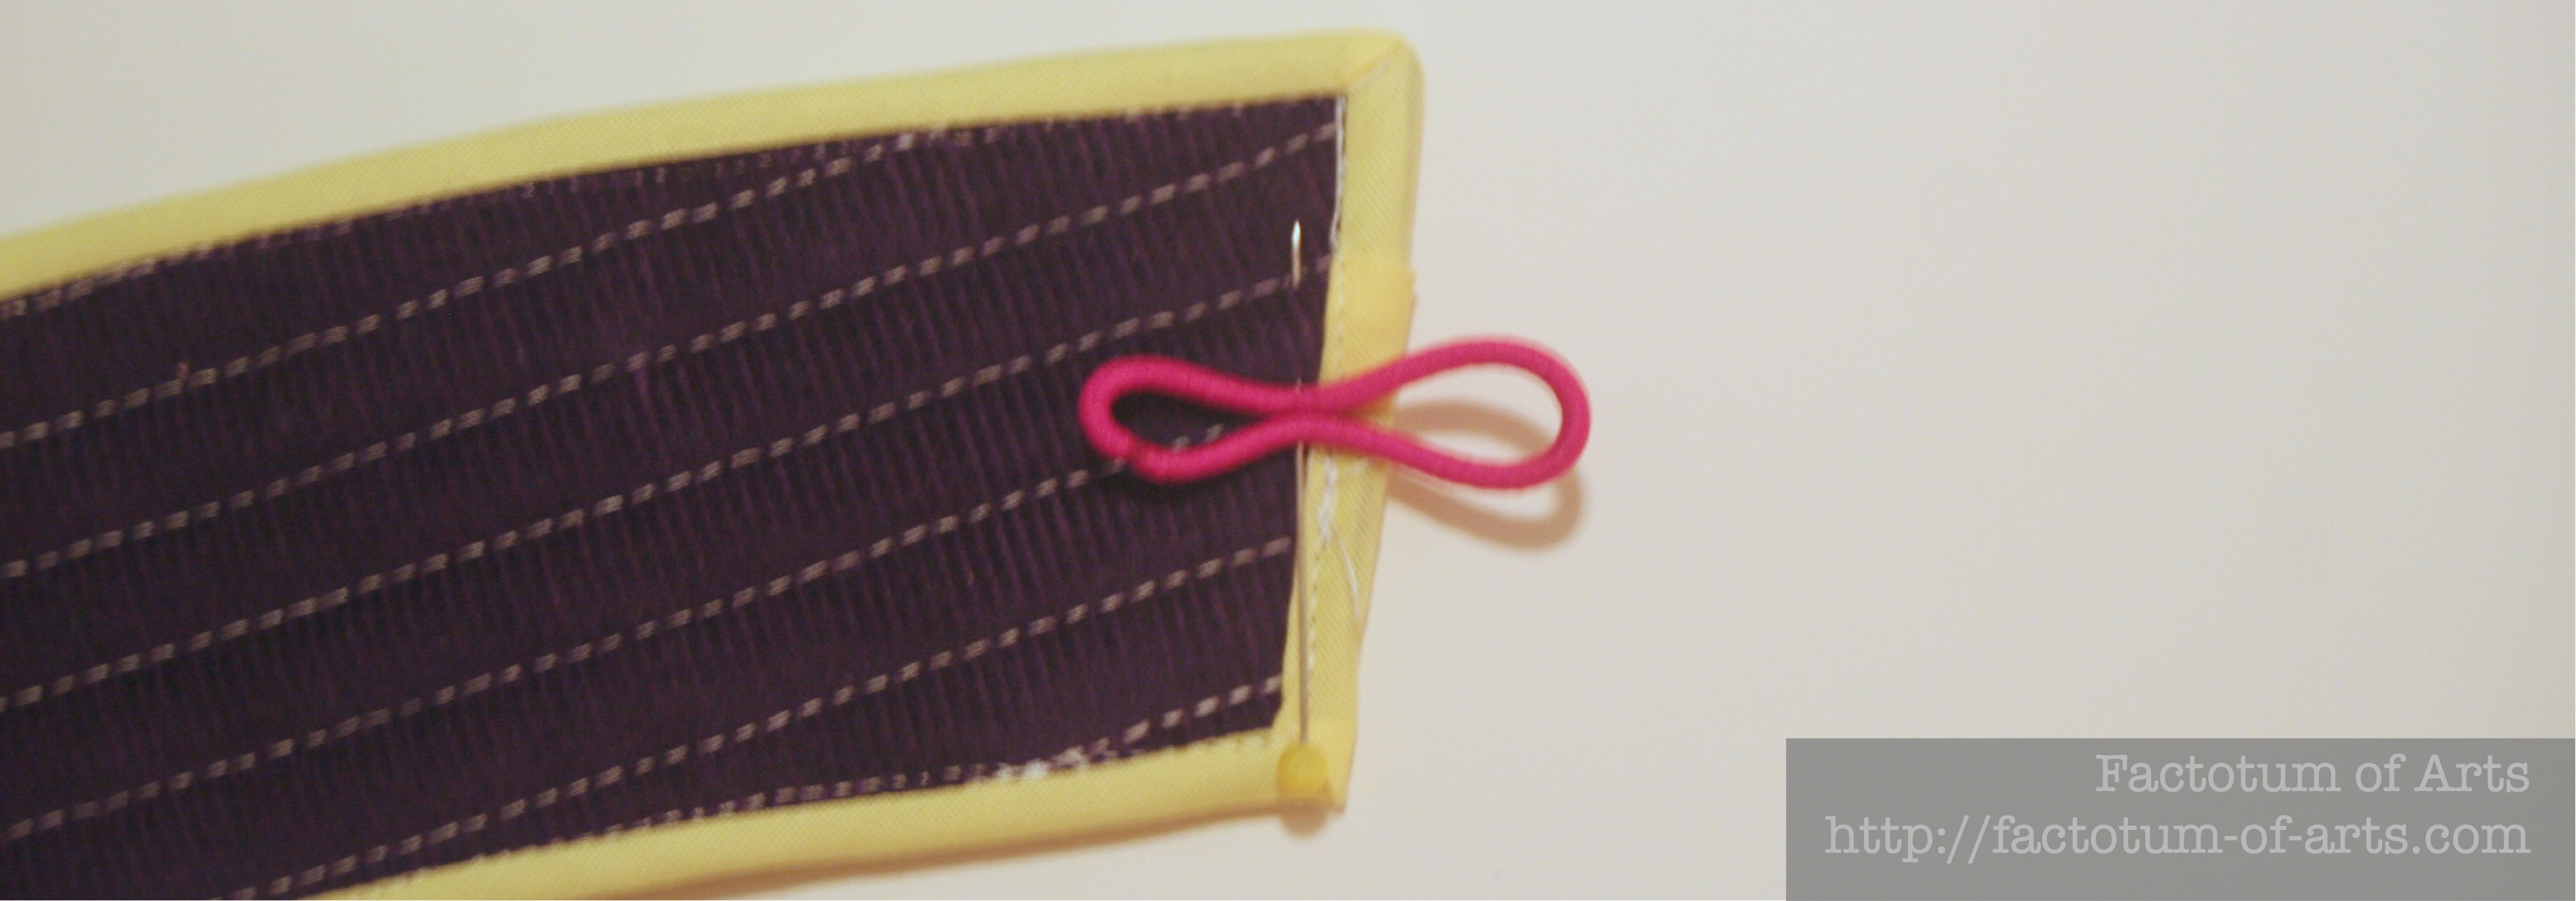
- Once the binding is on add the finishing details. On the slightly angled edge, pin the middle of the hair tie together, and pin it to the middle of the sleeve.

- Turn the coffee cup sleeve over and sew along the top stitching of the binding to mask the stitching. Back stitch, back across the hair tie to add strength to the securing stitches.
- To finish off securing the hair tie, add about 10 stitches attaching the end of the hair tie to the back. Make sure your stitches do not go through the front. Use a thread color to match the corduroy.

- Last step, is attaching the button to the straighter edge of the coffee cup sleeve. I use a 4 hole button, as it is more stable than a 2 hole which is needed with the pull of from the hair tie.

- That’s it, the only thing left is to try it on your cup. It should fit a Starbuck’s cup and their $1 recycle cup and Caribou Cafe etc.


I hope you enjoy, and I would love to see any you make up. If you have any questions let me know.
Small Giveaway
Now, for a small giveaway…I have an extra coffee cup sleeve of the one above and I will throw in some recent scraps as well, whatever I can fit in the envelope. Just leave a comment below on what handmade gifts you are making for Christmas. If you are a follower you get a second entry – just let me know below. I will randomly draw a winner next Sunday at 6pm EST.
Linking up with Sew Cute Tuesday and Let’s Bee Social (see buttons on the right).

1. So far I have made 7 roll up shopping bags!
2. Minimally I hope to make some Apple mug rugs for the Mac users in my family! After seeing this tutorial I may add some copies to their gifts!!
3. I’m working on quilting a quilt for my mom for Christmas, but it’s been so slow going that it make turn into a Mother’s Day gift if I don’t buckle down and get working at it 😀 I’m also planning to make some felt ornaments for some family members – several years ago I did a bunch of Matroyshka dolls for my immediate family, but I’ve been asked to do some for some cousins too, so I want to get them done this year as well.
4. Also, I follow via Feedly.
5. Love it! Thank you so much for your awesome tutorial! Love it as well as you have lots of photos. These would make super stocking stuffers for my quilting group. I’m making zippered pouches, tablerunners and now coffee cup sleeves, hehe.
Thank you for a lovely giveaway and a chance to win.
usairdoll(at)gmail(dot)com
6. I follow you on IG and now I’m a new follower on BlogLovin.
Thanks again for a super giveaway!
usairdoll(at)gmail(dot)com
7. I’ve made a few of these, but I cut the sleeve into even wedges, made EPP templates and hand stitched them. Yours are much quicker!
8. … and I follow you on WordPress
9. What a great idea for Christmas!
I’m making aprons for all my sisters!
10. Email follower!
11. Oy! My to make Xmas list is long…but already started checking a few things off! I’ve made some Xmas stockings already and plan on making 6 pillows, a table runner, and eeek a queen sized quilt! Waiting for the fabric to arrive this week! (Follow on feedly and IG) thanks for the tutorial…I learned something new re: binding! 🙂
12. i follow via newsletter
13. mug rugs, casserole carriers and stocking are my wips
14. I am making a quilt for a friend who is coming to stay with us. I’ll see if I have any time left after that!
15. I follow on Bloglovin!
16. I follow you via email. This is such a wonderful idea. Thanks for sharing.
17. I don’t have much time sewing for Christmas this year. My time is mostly taken up with wedding sewing for our son. But I will be making a pin cushion for his fiancé.
18. I have no plans to make any gifts for Christmas, haha. My family is pretty low key about presents, and the adults only do a secret santa. If I draw my mom or sister I might make them a Washi dress. And I might make new stockings for us with some xmas fabric I won…we’ll see since I am planning to work on a big commission next month and want to get it done by the new year! I love the pink and purple fabrics you chose to go with the linen! I need to get more quilting linen…
19. I do not have any plans to make specific Christmas quilted / sewn gifts right now, but I have really been eyeing a stocking pattern that looks like fun, so that might change!
20. I follow via Bloglovin’.
21. This is such a great idea! xx
22. I also follow on bloglovin and although I don’t always comment, I do always read! xx
23. Yes, I am a follower and your coffee cup sleeve is a wonderful idea for a quick gift this CHristmas,
24. I have a lap quilt finished for my son in law and a wall hanging nearly done for my son. I made some luggage tags for the daughter and son in law since they are getting suitcases this year, otherwise that’s it for gifts this year.
25. Great idea! Thanks for sharing
26. I’m making coffee sleeves believe it or not. I just bought a multi pack of hair ties yesterday , enough for 2o or so. I love your multi-tasking method of quilting w/cordorouy, fusi fleece and the bias tape.
27. Hi Michelle, I’m visiting from Let’s Bee Social – great tutorial, now posted to my Pinterest board! Thank you 🙂
28. Great tutorial 🙂 That’s a good way to use up some of my smaller scraps – maybe for gifts?!
This christmas, I’m making a cushion cover and some bags and an apron – lots of variety 🙂
29. I’ve made a couple lap quilts, one of which is a T-shirt quilt and a cactus pin cushion. I still have to make something for my guild gift exchange. Maybe a coffee sleeve will be part of that gift.
30. I think I might try to make come coffee cozies! I am giving my mother in law a quilt for Christmas, an Album Quilt, made in reproduction fabrics.
Pingback: Pattern testers wanted | Factotum of Arts