A few weeks ago, I was stressing out about so many things – work, quilt projects, household tasks, kid things. I decided that I needed a creative reboot and find a project that involved little to no planning, no stress….just free playing around.
I have been inspired by Luci Summers’ “Quilt Improv: Incredible Quilts from Everyday Inspirations” and Sherri Lynn Wood’s “The Improv Handwork for Modern Quilters” for a while. I thought an improv project would meet my goal. I have to say, I loved every minute of this project.

I added some limits:
- Only use colored solids from my scrap bin to help me reduce my scraps
- A single addition is added each Sunday, spending no more than 2 hours to ensure I didn’t over think things or plan too much…go with the flow of that day
- At some stage (around week 2) decided I would used strip pieces and black/white stripe fabric for fillers.
Week 1
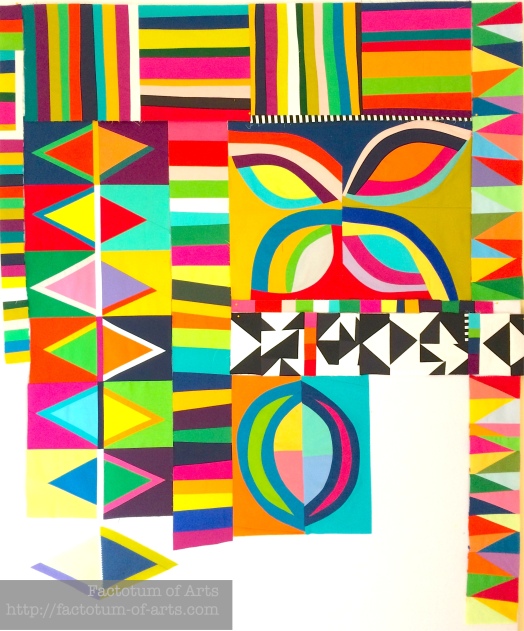
This first week I just wanted to start really simple, so I did some strip piecing by cutting irregularly strips (no ruler used) and placing them in a bag. I pulled out a piece and stitched them to another and continued until the bag was empty. I continued with this method “brown bag method” until I landed up with this strip. I did trim with a ruler once all sewn together.

Week 2
My love for the strip piecing continued, but this piece was inspired by the rail fence block. I played with the vertical and horizontal placement. I was slightly short on a couple of blocks, so I used the black/white stripe fabric as a filler. The saved the off-cuts from the block sections, thinking I could use them as filler pieces later on.

Week 3
I have mentioned previously how much I love Tapa cloths, I actually have 4 in my room. One of the designs is this diamond/double triangle, which inspired this addition. Most of these triangles were cut out of a 5″ charm pack that was in my scrap bin. I then played with the border and realized that I had some colored pieces that were not big enough to do both sides….this lead to the mixed borders around the triangles.

This addition is one of my favorites, and may lead to a new quilt design.
Week 4
Black and White solids were called for this week. It was Mother’s Day weekend. I was feeling down. I was thinking about my Mum and whether this could be her last mother’s day, and then feeling the additional guilt for not having her quilt finished yet.

I started with just wonky flying geese but they didn’t seem to fit. I added some of the HST off-cuts of the flying geese and loved the chaos look they provided to the flying geese. This is what, I finished with.
Week 5
Inspired by Frank Stella’s art work, I decided to play with curves this week. I had so much fun creating the orange peel – like block. I wasn’t done with improv curves though, and added a second block, inspired from my tapa cloths. After adding these two blocks, I realized that the column layout didn’t work as well. I decided to change the layout some.

Week 6
From week 3, I had a lot of left over triangles. In order to not have additional scraps, I stitched them blindly together (brown bag method) to make HSR (Half Square Rectangles).
Week 7
There have been several quilts lately, that inspired me to make these stripe 45 degree angled blocks. This addition is my favorite part of the quilt. I love how they fit horizontally across the bottom, complementing the columnar piecing from the previous week.

Week 8

I struggled this week. I had a couple of ideas and neither were working in this gap. One idea was another circular block but I think the color palette I used for the block made it not fit with the rest of the quilt. Don’t get me wrong, I love the block but think it needs its own quilt.

The other idea was various small log cabin blocks. Again, they did not look right. I decided to call it a day. I took the day off for my birthday this week, and gave it another go. Something made me cut up the log cabins and sew them all back together. That was it….a perfect addition to my crazy quilt.

Week 9
At this stage, I was feeling that the project was winding up. I pieced all the left over strip scraps and added the left column strip. Off-cuts from this, and having the old TV end of program sign stuck in my head, lead me to adding the black/white circle block (based on my phased circle block). Lastly, it was just finalizing layout and adding the filler pieces (which I also added for balance).

Week 10
This final week, I conquered my fear of partial seams (not easy when stitching really large parts of a quilt) and stitched it all together. It’s now a finished quilt top, measuring ~ 50 x 52″.

I am totally in love with this quilt. I am thinking, right now, of matchstick quilting it, using yellow thread (or may be various colors). I have to mentally prepare myself though for matchstick quilting.
For now though, I loved this free process so much I have already started another improv project (using that circle block from week 8).
Linking up with Amanda Jean @ Crazy Mom Quilts for Finish it up Friday.

I love this too! It looks like you had a lot of fun making it, even if there were moments in there.
I would like to offer a thought on the matchstick quilting though: I think it will make the ‘clean’ spaces of the colour change through the dense texturing that will result. One of the things I love is the flat bright colours and crisp edges, and I think this might change if you do matchstick quilt… Of course, this may be exactly what you had in mind!
Wow ! Striking ! I love the addition of black and white. Thank you for sharing your progress week after week.
This was a really interesting one to watch come together as the weeks went by on IG. It’s not a process I enjoy (improv), but it sure can lead to fun/fantastic results.
I can definitely see the inspiration from both of them! Your special color stamp is fantastic though. How wondeeful to see the 10 week evolution of such a personal and fun quilt!
Mmm! I like this colourful quilt a lot. It sounded like an enjoyable make. Fun sewing can really de-stress your mind and on top of that your end product is wonderful:) a win-win
This is a curious quilt. Its energizing, and despite the amazing range of colour, it just goes! It looks like you kidnapped it from a modern art gallery, and should have the appropriate price tag attached. Thanks for sharing your process, I look forward to seeing quilt number 2.
I have a solid-only, improv quilt in the works too. It’s in time-out because I am not sure how I feel about it. I love yours though!
It’s understandable why you’re in love with this quilt. It is fantastic! I’ve dabbled just a tiny bit with improv, and your quilt reminds me I need to revisit it again.
Thank you so much for explaining in detail what you were thinking each week. It was really a delight to see it take shape on Instagram. I am thinking you will remember much of what was happening in your life when you look at this quilt.
I really love watching the stages, week-to-week. Makes me want to start one too.
This turned out to be a beautiful quilt!! Made all the better reading about your process. Such a great idea and one I would love to try! I especially love how you allowed your self two hours a week and used the paper bag method! Amazing!
Love that you shared week by week. This is one of my favorite projects to watch come together ever. It is just so striking and wonderful! 😉
Thanks for sharing all your thought processes in making your wonderful quilt. I will love to see the quilted finish.
I’m so impressed by this quilt that grew from your scrap bin and needing to get away from stress an just play. Love it!
I’ve been quilting like this for a while! Mostly because i have TOO MUCH fabric and when i begin a “pattern” I always manage to “flub” something.. Hence, my theory…”There are no Mistakes…Only creative opportunities:) Got myself a “mid arm and frame”, so that all quilts are my work start to finish… They are all for charity or special friends:)
Now THAT was a fun post to read. I have never tried improv quilting but it looks like a lot of fun! Your quilt is full of life and the colors just grab me! I’ll be very interested to see how the quilting turns out.
Gorgeous. It’s great when something so much fun is also beautiful.
What a great progression from start to finish. I love that you shared your thought and design process!
Pingback: Orange Creamsicle {WiP} | Factotum of Arts
Pingback: Fly Away Quilt {finish} | Factotum of Arts
Pingback: In the Works | Factotum of Arts
Pingback: In the Works {Update} | Factotum of Arts
Pingback: Black + White: A Colour Blog Series | Factotum of Arts
Pingback: News + Finish {Sunday Best} | Factotum of Arts
This looks like a fun project! I’m currently working on a appliqué nightmare, but I think whenever we put our heart and soul into a project everything turns out even better than what we expected.