Author Archives: mlwilkie

Unknown's avatar

About mlwilkie

Software Developer, Mother, Wife with keen interest in art, design and crafts of all kinds.

Last minute finishes

First of Merry Christmas to you all. I hope you all had a happy holiday.

Sitting here today, waiting for banana bread and orange muffins to finish baking. It’s the perfect time to catch-up on some project finishes.

Portable selvedge ironing board

I finished my portable ironing board made from selvedges. I have been asked by several people “how does it work ironing on”.  As the selvedges are top stitched there is very little bulk, and so far the ridges or bumps have not pressed through & the board has held up well so far.

PortableIroningBoard

Please note when making a portable ironing board, there are a couple of differences from the tutorial I posted a few days ago.

  • The 17 x 17″ board is much harder than the ironing board that below the insulated ironing padding, I added an additional layer of batting.
  • For the edging, I used four (4) 17.5″ x 3″ strips. Sewed each strip together to form a square, pressed the seams. When sewing the strips to the top, pin at the corners and sew corner to corner, leaving a 1/4 space at each end (this allows the ability to turn easily and have neat corners).
  • Lightly stretch top over the board and using a staple gun adhere the fabric to the board. I then used washi tape to finish the edges neatly and added small feet to the bottom of the board.

I plan to make a couple more ironing board covers and use more of my constantly growing pile of selvedges. Definitely a fun project!!

Sisterhood of the Traveling Quilts

I finished Ashley’s Quilt top right before Christmas. I love it. I would so not have made a rainbow quilt on my own, so this experience was fantastic. More information about all the contributors in this WiP post.

SisterhoodTravelingQuilt

Design wall

My hubby moved his office of the bonus room and now I have the whole room to myself. He had the only valuable flat wall space. I now have my 7 x 8′ design wall up. It’s so great to have that much space!!

DesignWall

Its been a week of some great accomplishments and so happy with my new work items. I hope you all have a great New Year!!


Reflection + Goals 2016

For this year’s reflection and goals, I am joining in Yvonne @ Quilting Jet Girl Planning Party Link-up (see button below).

Reflection – 2015

Reflecting on my goals from last year, I think I did pretty well…though my goals altered during the year.

  • My biggest goal for the beginning of the year is to sew just from my stash. If I run out of a fabric in the middle of a project or require backing fabric, I can make a purchase.
    X Did not accomplish for most of the year to met this goal, but in this last quarter I am doing more of this.

    IMG_5513

  • Continue to make strides in finishing of my projects on a monthly basis (see below for project plans/targets). I will definitely continue goal setting with A Lovely Year of Finishes.
    I definitely finished a project every month, finishing 16 projects which were mostly quilts. I did not finish the projects I identified earlier this year but I am happy with the flexibility.

    mosaicd5919d85d20159a033587cd2b4da006f3d6d7233

  • Make my son a quilt
    X Did not accomplish this
  •  Participate more in the quilting community
    Overall, I think I accomplished this, just not completely in the way I thought I would. I made some great friends and relationships this year. I also participated more via Instagram vs. my blog and participated in 3 blog hops.

    • Launch “Back to School” Tutorial series on my blog, which I hope will be a regular feature (coming beginning in January).
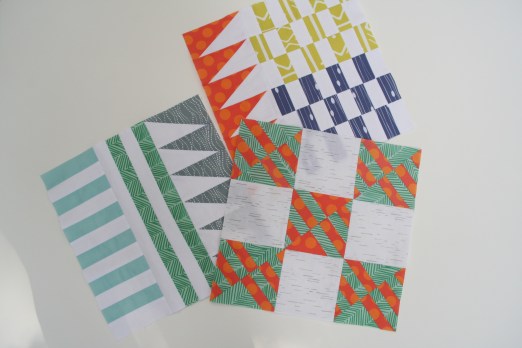
      X This did not come together. I did start the Spoonflower Sampler Quilt block tutorials, quilting triangle tutorials and lately how to use your selvedges to make an ironing board cover.
      IMG_9503
    • Plan and teach new classes this year. I hope to teach a needle-turn applique and a paper-piecing class this year.
      This is coming together nicely. I took the time this year to developed a couple of classes which I am having the opportunity to teach in 2016.
    • I have really enjoyed sharing Design to Reality on Sew Mama Sew, so I would like to continue contributing projects and take the big step of seeing if I can publish in magazines.
      To my surprise I have managed to get 4 projects in print (includes Quilt Now, Love Patchwork & Quilting, Art Gallery Lookbook) , with another 3 projects coming out early 2016.

      Love Patchwork & Quilting issue 29 NEGATIVE CROSSWALKS

    • Participate more in my guild (Triangle MQG).
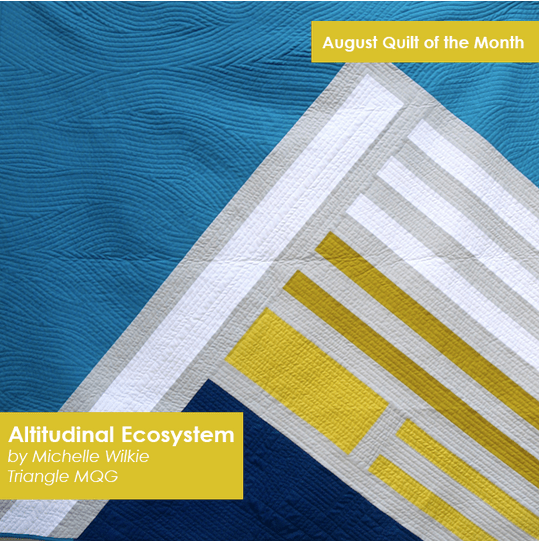
      I ran as President for my local guild!! It was a lot of fun. I also contributed to the MQG Quilt of the Month. Oh, and I had two quilts accepted at QuiltCon 2015…my first quilt show, 2 quilts are going to QuiltCon 2016.
      Altitudinal Ecosysytem
  • Design goals include:
    • Continue participating in Quilt Design a Day.
    • Try out a 1-2 new fabric designs via Spoonflower
      Completed both these goals and accomplished making my designs into reality.

Goals – 2016

This year (2015) has set up many of my goals for 2016. I am super excited about the opportunities.

  • Make that quilt for my son and another one for my mom.
  • Continue making my designs into reality. My goal is to make 1 quilt a month…12 quilting projects total.
  • Start a blog or Instagram series, related to design (plans are underway).
  • Release at least 4 patterns (PDF and in Print).
  • Go to Spring Quilt Market (I was approved/qualified!!)
  • Teach at least 4 quilting classes and attend at least 2 quilting classes.
  • Submit quilts for consideration to juried quilt shows (definitely QuiltCon 2017)
  • Submit an application for an art gallery showing.
  • Make some decisions about my brand to set up for the future.

It is important to me to find balance, so I want to also:

  • Start exercising again.
  • Family.
  • Don’t stress about blogging, share when and where it makes sense.
  • Give myself permission to play and experiment, it’s not all about deadlines and getting finishes.
  • Continue and participate more in Quilt Design a Day. Make the time.
  • Support my quilty friends and continue to build those friendships (locally and online).

That’s it, I think, for this upcoming year. What about you all?? Check out Yvonne’s link up and be inspired 🙂 Happy Holidays.

2016 Planning Party

Tutorial: Selvedge Ironing Board Cover

This weekend, I was frustrated with my ironing board cover. It continued to fall off and was dirty from water stains and just yuck!! I had also been searching for a use of my selvedges (selvages in the US), I had been collecting. Perfect pairing in my opinion, and I made a ironing board cover from them. I loved how my new ironing board cover looks…. (#sewmystash2015)

IMG_5513

It was not overly complicated to make, and can easily done in an afternoon. So, here are my steps.

Materials
~1-2 yards of ironing board cover fabric (quilted)
~ 50 selvedges of varying widths (minimum 1″)
Three (3) 3 1/2″ strips WOF (width of fabric)
3 yards 1/2″ Dritz Knit Elastic White

NOTE: I bought the ironing board fabric at Joann’s.  The amount you will need will vary on the board you are making the cover for, so measure the length of your board before purchasing.

Instructions

  1. I sorted my selvedges into three piles based on warm, cold and neutral color palettes. I also made sure that they were at a minimum 1″ wide.  I decided that I would use the warm color palette for my new  cover.
    IMG_5510
  2. I took the old ironing board cover and used the inside batting as a template. I pinned this to my iron board cover fabric (quilted fabric).  Draw an outline and then cut out the shape.
    IMG_5506

    The goal is to cover the full ironing board cut out, which will be done using either long or pieced strips of selvedges.
    IMG_5508

  3. Starting at the wide end, stitch your first strip by stitching the selvedge edge to the top edge of the cover. Continue adding selvedge strips, covering the raw edge with a selvedge edge and top stitching the strip in place.
    IMG_5512
  4. Continue until the whole cover is covered. Turn it over and trim the edge.
  5. Take the three (3) 3 1/2″ strips and stitch them together (straight 1/4″ seams). Fold along one edge 1/4″ and press in place.
  6. Attach the other edge to your selvedge top (RST – right sides together). Similar to sewing binding on a quilt…leave about a 4″ tail before starting to stitch. Start along one of the long edges and stitch ~ 1/2″ seam. You will need to constantly reposition the fabric when stitching the curves, carefully as not to catch the folds.
    NOTE: If you feel so inclined, you could also zig-zag or use an overlocker along the edges to neatly finish this inside seam and add extra strength. I did not do this step.
  7. Continue to stitch until you get ~ 5″ from the end. Overlay the ends and trim so that each end overlaps 1/2″. Place the ends right side together and stitch a 1/2″ seam. Finish stitching the edge to your cover top.
  8. Place the elastic to the inside of the strip along the raw edge of the 1/4″ fold. Pin the end in place.
    LineUpElastic
  9. Fold over the 1/4″ fold over the elastic forming another 1/4″ seam (so that edge is folded over twice). At approximately 4 ” from the end of the elastic, start to stitch elastic and seam in place. As you stitch pull on the elastic, and continuing folding over the fabric edge.
    NOTE: You want tension on the elastic so that it will stretch around the ironing board and then pull back to hold it in place.
    StitchElasticSeam

  10. Continue to stitch until you get ~ 5″ from the end. Overlay the ends and trim so that edges overlap 1/2″. Place the ends right side together and stitch a 1/2″ seam (reverse and restitch to finish with a triple stitched edge). Finish stitching the edge of the elastic to the fabric.
  11. Optional: To finish neatly you may choose to top stitch the top of the elastic to the fabric as well.

    IMG_5516

  12. You are all done. Place over the narrow part of your ironing board and pull over the other end.

This method works for any ironing board. I am also using this for a portable (17 x 17″) ironing board, as well in a neutral palette. I am replacing the elastic with staples, in this case.
IMG_5520

Let me know if you have any questions. I would love to see your new covers, so tag me on Instagram (IG) ml_wilkie or leave a comment below with a link to a picture/blog.

Please refer to this tutorial when posting. This tutorial is for personal use only.