As promised here is the Tutorial to make a iPhone/iPad (or other electronic device) stand I posted last week.

Materials:
- Fabric 12″ x 9″
- Cotton
- 2-3 cups of rice
- Pellon Ultra Firm 1 1/4″ x 5 3/4″
- Polyester Fill
- Start with a piece of fabric that is 12″ x 9″. Fold in 1/2 and press (6″ x 9″ size once folded)

- Sew a 1/4 inch seam at the top, with a 1 – 1 1/2 ” gap, and the side of the folded fabric (refer to black lines).

- Fold the fabric so that the side seam is now in the middle at the back. The top will form triangles. I press the seam open for a flat appearance later.Sew along the bottom to form a 1/4 inch seam leaving a 1 – 11/2 inch gap (refer to black lines).

- Through one of the holes, feed the fabric through to invert fabric to show right side. Use a chop stick (or other device to ensure the corners are turned completely.
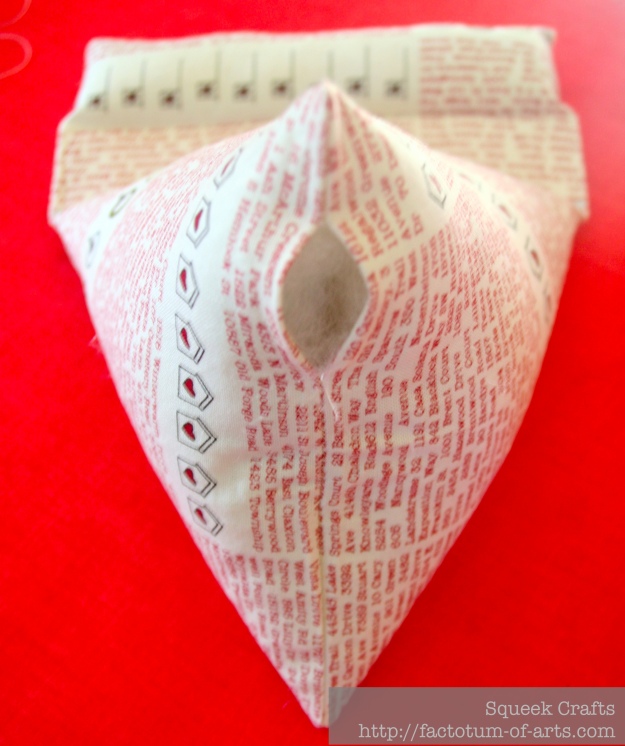
- Measure 3 inches from the bottom seam. Mark with chalk on each side (refer to where the chop stick is pointing). This will be the mark you will use to place the Pellon Ultra Firm Strip.

- Feed the Pellon Ultra Firm through the whole at the bottom.

- Move The Ultra Firm Strip into position with the top aligned with the chalk marks. Pin strip. Sew a border around the strip to ensure it remains in place (refer to black lines).

- Through the hole at the bottom, stuff with polyester filling until fill.

- Hand sew the bottom hole closed. I use a slip stitch to close my openings.

- For the main pillow, fill with rice. I use a Wilson piping bag to aid in adding the rice through the hole. NOTE: The rice will add a nice weight to the stand to make sure it will support the relevant electronic device.

- Fill as far as you can, approx. 3/4, or more, fill. You will have room at the top.
- Fill the rest of the space with the polyester filling.
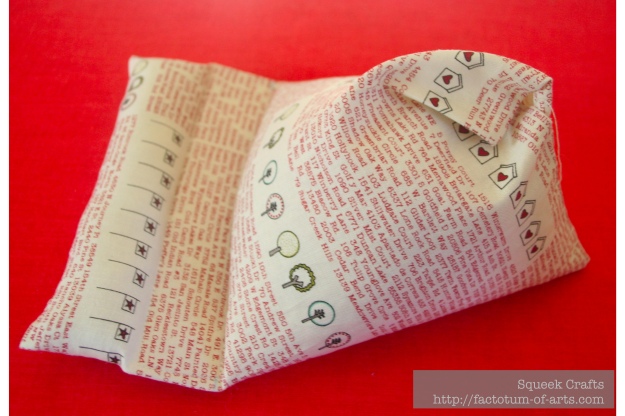
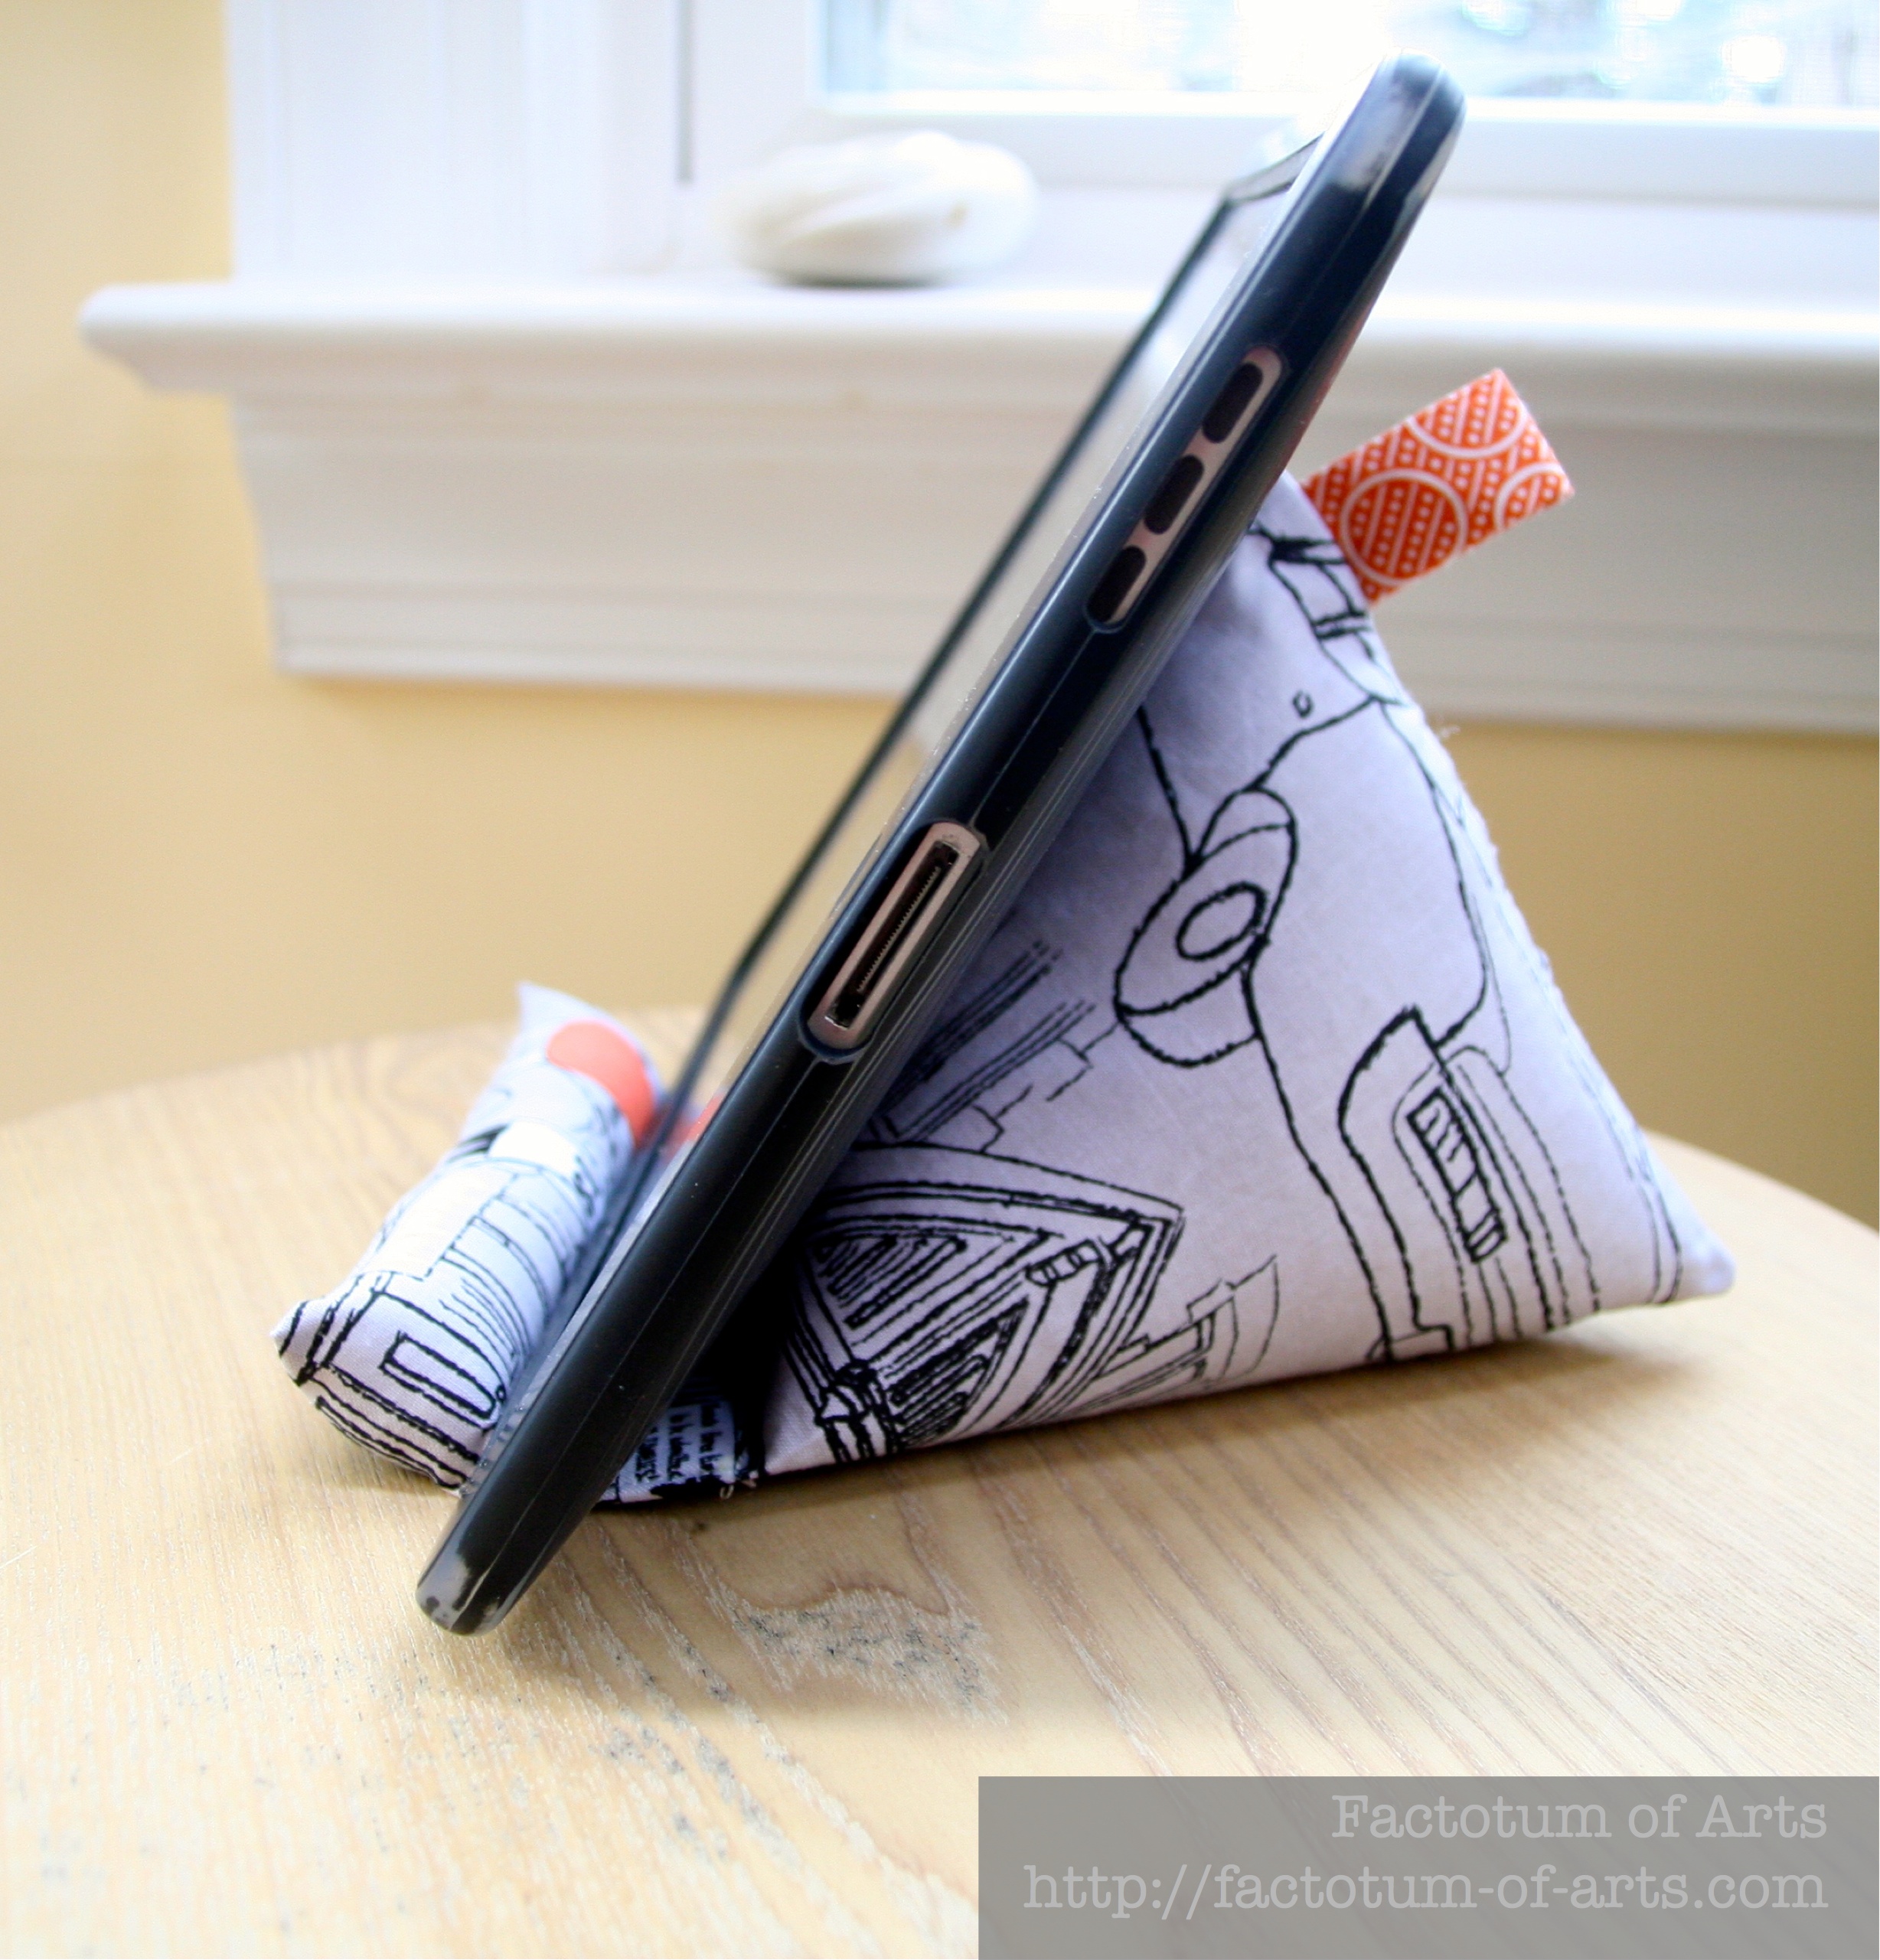
- Hand stitch top opening close. You now have a complete electronic stand.


My friends are loving these, so I hope your friends do to (or whoever you are gifting it to). If you have any questions or feedback let me know, leave a comment.
Update: I have had several people ask if they can use this also for an iPad. As mentioned in the title, we do use it for an iPad, which is usually used for Netflix/Videos. This means we typically have it in a horizontal position.
I would agree that this size stand would not work for an iPad if you were wanting to use vertically. I have not provided the measurements, if this is what you would like it for.
This tutorial is for personal use only.
Linking up with Amanda Jean @ Crazy Mom Quilts for Finish it up Friday.

Thank u sew much for sharing how to make these!! Ive made lots n lots of them! its a easy, simple straight forward tutorial x
I cant thank you enough for the pattern and wonderful tutorial! I have enjoyed making mine and now making one for my daughter!
Thank you so much for the share. I am making two for my kiddos’ new Fires.
Awesome directions and project! Made one up tonight and love it. I didn’t have the pelon ultra firm, but used plastic canvas instead. Increased the size slightly to accommodate my mini-iPad. Am in love with your design!!!
I have a commercial pattern for this and the directions are horrid, and I’ve been sewing for 50+ years. Your tutorial saved the night…and the project. I needed a quick gift and sincerely appreciate you taking the time to post photos and instructions. Very grateful. ; )
I am making this as a belated Christmas gift, can’t wait to see it done. Thanks for taking the time to write up a thorough blog post, with pictures and everything!
Pingback: Love you SO much I can barely stand it! | the green apricot
Pingback: Soporte para móvil | anaenlana
Pingback: ToDo List: Phone/Tablet stand – Scrappy Taffy
My nan has set me the challenge to make one if these. I don’t understand what to do when you get to the bit with the corners or to make it into a triangle please help x
Pingback: 28 Christmas Gifts for Moms Who Love to Read | Dodo Burd
Pingback: You Fed Me Decaf? Episode 192 | The Weasley Sisters
Thank you so much. I’ve been wanting to make some of these for gifts for family and some instructions are so involved. This is very straightforward and easy. Thanks again.
This is a wonderful pattern. I only found one suggestion. The length of the pellon should be 5 1/2 inches. Other than that a great sew. Thanks for the tutorial.
Thank you for taking the time to do this tutorial. Really clear and easy to follow. I have made several now for family members who have all found them useful.
Kindest regards
Marianne
Please, what it Pelon? Is it a stiffener? Looking forward to making these for Christmas gifts for family. Thank you
Pingback: Our Creative Souls – My Creative Corner3
Thanks so much for this super pattern and tutorial. Brilliant, easy, quick, and works beautifully. Beaut gifts for friends and family.
Love this! But, how do I print it out?
It’s a standard web page (html). You should be able to print the web page but I am not sure on how it will format
I tried to click your link to your Etsy store, Squeek Crafts & it said that member doesn’t exist.
Hi Debra, this post was written 5 years ago; I have since closed my store.
I’m confused if I have a piece of fabric 12×9 and fold it in half that would be 6 x 4,5, Should it be 12 x18 to start? Thanks.
If you fold it in 1/2, it will be 6×9 inches
Thanks for the cute pattern! It’s perfect for my Kindle.
Thanks for sharing. The instructions are perfect. I have made two of them. I have a lot of corn feed left from corn hole bags that i made. I used the corn feed instead of the rice and I used some poly fill at the top of the point. I am using one in my sewing room for my phone and a pin cushion. I will try to print out the instructions. Thanks again! They will make nice Christmas gifts.
What is the size of the phone in the photo? My phone is 6″ tall, and 3″ wide. I’m trying to figure out if I need to alter the size at all. Thanks for posting this!
You won’t need to change the size. It should work fine as I use it with an iPad
Thanks for the great tutorial, I am rummaging thru my resource center (ie stash) to find just the right piece of fabric for each of my Christmas recipients. My question: Do you sew thru the Pellon to tack it down, or try to sew on the outside of it- around it? I was not too successful sewing around it, no matter how I placed the needle and which foot I used on the machine. Any suggestions and ideas?
I see around the pellon but if you catch the edge it will not matter. I just use my normal sewing foot and just piñon each end to hold the Pellon in place.
Thank you for the clear instructions! So easy to follow! Wasn’t liking some of the other styles of these, but this one was perfect! Fits my iPhone and the kids iPad too! I stuffed mine with beans and serger scraps! Giving a few as gifts!
Made three of these as stocking stuffers for my husband and kids, and couldn’t be more thrilled with how they turned out. I couldn’t find the strips and so just used some plastic sheets and cut to size. I don’t so often and I’m far from an expert but I managed to make all three in about 2 hours. Thanks for the clear instructions!
I must have made about 20 of these! Thank you so much for the tutorial. Everyone is always so appreciative when they receive one!
Thank you! I am so glad folks enjoy them👍
Pingback: Five for Friday – Father’s Day Sewing – auribuzz
Excelente tutorial, fácil en la explicación, lo entendí rápidamente. Gracias por compartir. Exitos en tus proyectos.
Brilliant! Have just finished one now to make another 😃 Thank you xx
Yay!!! Glad you like the stand
👍💐
Pingback: 34 Quick & Easy DIY Phone Stand Ideas
I have three in progress for Christmas gifts. I found that the top of a plastic water bottle works fine for filling the stand with rice.Just cut the bottle in half and use the top as a funnel. Be sure it’s dry.